Friday, December 10, 2010

Bragging Rights

Pacific Beach Community Garden

Sherry's garden plot was awarded "Garden of the Month" this past month at the Pacific Beach Community Garden. Not bad for something that was just a plot of dirt with potential a few months ago.

While I'm bragging, I might as well mention that we're still getting tomatoes in December. I love you, San Diego!

Pacific Beach Community Garden

Monday, December 6, 2010

Smoked Almond Brittle

Smoked Almond Brittle

The issue of what to do with leftover home-smoked almonds doesn't come up often in our household - they are usually gone too fast. Recently, however, we smoked a big enough batch that they somehow managed to outlast the initial wave of gluttony.

Faced with these rarefied leftover almonds, we decided to try making them into a brittle. Neither one of us really has much of a sweet tooth, but if you add nuts to the equation we're all over it. We found an almond brittle recipe in Mario Batali's Holiday Food and went from there.

Smoked Almond Brittle

The recipe is pretty simple. Coarsely chop some smoked almonds, then toast them in the oven a few minutes to make sure they're nice and crunchy. Put plain, white sugar into a sauce pan along with a little water to moisten it and set over medium heat. Watch carefully - it will be clear and bubble vigorously as the water cooks off, but once it starts turning from straw to caramel colored you will need to move fast. Just before it hits the color you want, pull the pan from the heat and quickly stir in the nuts. Immediately spread the mixture out on a sheet pan lightly greased with butter or lined with a Silpat.

Once it's cool, the candy can easily be snapped into small, irregular pieces. You can adjust the flavor by varying the darkness of the caramel - cooked to just tan, it'll be rather toffee flavored, but cooked to a deep caramel color it will be more intense with a slight bitterness to it. Since the smoked almonds are already intense, we found that we prefer it on the lighter side of caramel.

Smoked Almond Brittle

Smoked Almond Brittle

This recipe can easily be doubled or even quadrupled.

1 cup Smoked Almonds
3/4 cup sugar
2 tablespoons water

Coarsely chop the smoked almonds and spread them out on a sheet pan. Toast them in a 400°F oven for about 5 minutes, then set aside to cool. Lightly grease another sheet pan with butter, or line it with a Silpat baking mat.

Put the sugar into a small, heavy-bottom sauce pan. Stir in 2 tablespoons of water and set over medium heat. Without stirring, let the sugar come to a boil and watch carefully until it starts turning a golden, caramel color (about 15 minutes). Just before it hits the color you want, pull the pan from the heat and quickly stir in the nuts. Immediately dump the mixture onto the prepared sheet pan and use a silcone spatula to spread it out into an even layer about a quarter-inch thick.

Let the candy cool completely and then break it into attractive, irregular pieces. Stored in an airtight container, the brittle will keep for several weeks.

Thursday, November 18, 2010

Thanksgiving Redux - Some Past Dishes

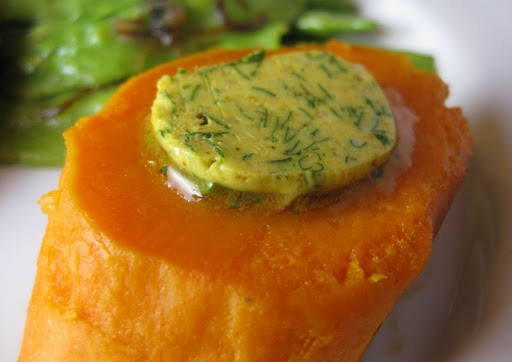
Yams with Moroccan Compound Butter

We're doing a traditional Thanksgiving meal with family this year, but many times it is just the two of us. Given that, we often try to find a way to do something other than a whole turkey. We also like to try twists on the traditional holiday meal, while still keeping the spirit intact.

Here are a few dishes we've done in years past:

Rolled Turkey Leg Stuffed Thanksgiving-StyleRolled Turkey Leg Stuffed Thanksgiving-Style

We're both dark meat people, so a meal composed solely of the leg and thigh is perfect for us. The stuffing inside keeps things solidly Thanksgiving-y.

Add a sausage in the middle for extra credit.
Thanksgiving Stuffing Croquettes with a Gravy CenterThanksgiving Stuffing Croquettes with a Gravy Center

We invented these little guys last year - a ball of stuffing filled with bits of turkey, coasted in panko crumbs and deep-fried. The molten gravy in the center seals the deal.
Roasted Yams with Moroccan-Spiced Compound ButterRoasted Yams with Moroccan-Spiced Compound Butter

Yams go really well with North African flavors. The simple addition of this compound butter takes a standard holiday side dish in a completely different, delicious direction.
Smoked Turkey BreastSmoked Turkey Breast

And of course we can't forget the smoker...

Have a great and food-filled holiday!

Sunday, November 7, 2010

Homemade Mozzarella with Garden-Fresh Tomatoes and Marjoram

Homemade Mozzarella with Tomatoes and Marjoram

Even though we didn't get started on our garden plot until early September, we still wanted to give tomatoes a shot. We planted some varieties known to tolerate colder weather (Early Girl, Siletz, Glacier) , and were lucky to get some help from late season warm weather.

While we haven't gotten a ton of tomatoes, the ones we have are very tasty. Yesterday, Sherry made up a batch of fresh mozzarella to enjoy with some of them. We didn't have any basil on hand, so we picked some sprigs of marjoram from our patio.

Homemade Mozzarella with Tomatoes and Marjoram

Sherry has had trouble making mozzarella in the past, but this batch came out perfectly. It is really easy to make (when it works). If you are interested in giving it a try, stop by our friends' new cheese and wine making shop, Curds and Wine when it opens this Thursday and get yourself some cheese making supplies.

Tuesday, November 2, 2010

My New Camera Takes Offal Pictures

Smoked Pork Tongue

For years now, I've been plugging away with my little canon point-and-shoot while coveting each new generation of digital SLR cameras that comes out. Last week, I finally took the plunge and gave myself an early birthday present in the form of a Canon T2i.

What better way to break in the new toy than with some pictures of tasty pig parts? Pictured above is smoked pork tongue with a vinaigrette. We were making Coppa di Testa and had a tongue leftover, so we brined it and smoked it at the same time as some slabs of bacon we were doing. Good stuff.

Speaking of the testa, we did a post on Warm Testa with Waxy Potatoes (a recipe from the Babbo Cookbook) way back in 2007. It was a good then, and it is still a good dish now:

Warm Testa with Waxy Potatoes

And we never make a batch of testa without doing some Testa on Toast...

Testa on Toast

So far I'm really pleased with the new camera, although I haven't done much beyond fully automated shooting yet. It does hi def video, so we might have to try our hands at some food in motion. We'll see...

Friday, October 22, 2010

Brewing with Fresh Hops - A Wet Hop IPA Recipe

Cascade/Nugget Wet Hop IPA

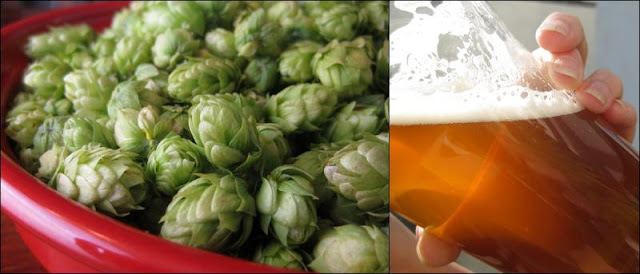
Back in August, we posted about picking fresh Cascade and Nugget hops at Star B Ranch. We've been drinking the beer we made from those hops for a month or so now, so I guess we are overdue on posting about brewing the beer itself.

Scouring the internet didn't turn up a whole lot of information on brewing with fresh hops, and what information we did find was often contradictory. Since our beer turned out well, hopefully this recipe will help the next person searching for information on the subject.

Cascade/Nugget Wet Hop IPA

We used our standard west-coast IPA malt bill, so there were no variables to worry about there. With the hops, though, the questions were how much to use, and when? In terms of amounts, the general wisdom seems to be that you want to use about 4-5 times the weight of fresh hops as compared to what you would use with dried hops - this accounts for the extra weight from water in the fresh hop flowers.

Given that we normally use 6 oz of prepared hops, by that calculation we'd need 24-30 oz of fresh - nearly two pounds! But, since we only picked about 18 ounces, that would have to do...

Regarding timing, I had read that you can get too grassy a taste if you boil the hop flowers too long, so we decided to push most of the hop additions later than usual in the schedule.

Cascade/Nugget Wet Hop IPA

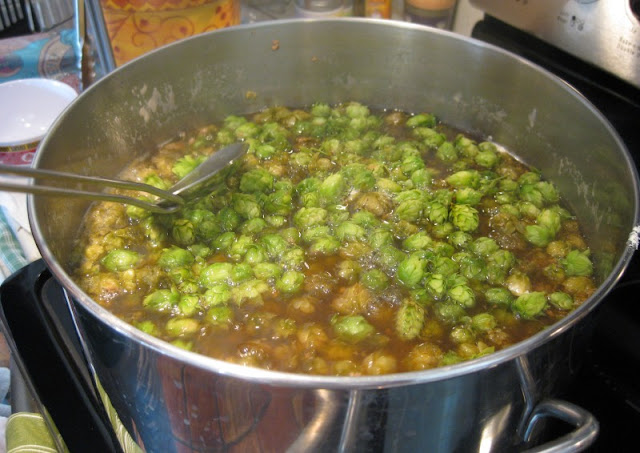
By the time we had finished adding the hops, they were definitely starting to pile up - you definitely don't want to be using an undersized pot. Once they were saturated with wort, however, they became more manageable.
Cascade/Nugget Wet Hop IPA

At the dry hopping stage, space becomes an issue again. We were barely able to get all of the hops into our secondary fermenter. Again, though, they shrunk down as they got wet.

Cascade/Nugget Wet Hop IPA

We had also read that dry hopping for too long can cause problems, so we only dry hopped for a week rather than close to two like we usually do.

The result was a very pleasant, subtly hoppy beer. Given that the flavor was not at all overly grassy, I think if we do another fresh hop beer we would move the hop schedule up in the boil and and increase the dry hop time to both increase the bitterness and the aroma.

The recipe that follows is exactly what we did:

Cascade/Nugget Wet Hop IPA

Fresh Hops in the Boil and Wet-Hopped in Secondary; Total batch size = 5 gallons; Partial Mash in 3 gallon beverage cooler; ~3 gallon 60 minute stove-top boil; late malt extract addition; target abv of 7.5%. Note: Use the fresh hops as soon after picking as possible; store fresh hops for wet/dry hopping refrigerated in an air-tight container.

5 lb 2-Row Pale Malt
1/2 lb Wheat Malt
1/2 lb Carapils/Dextrin Malt
5 1/4 lb Briess Golden Light Dry Malt Extract (DME)
10 oz Whole, Fresh Cascade Hop Flowers (est. 8% AA)
7.5 oz Whole, Fresh Nugget Hop Flowers (est. 11% AA)
1 tablet Whirlfloc
White Labs WLP001 California Ale Yeast


Hop Schedule:
1 oz fresh Nugget - 60 minutes boil
1/2 oz fresh Nugget - 45 minutes boil
1 oz fresh Cascade - 30 minutes boil
1/2 oz fresh Cascade - 15 minutes boil
1 oz fresh Cascade - 10 minutes boil
1/2 oz fresh Nugget - 5 minutes boil
3 oz fresh Cascade - 0 minutes boil - flameout
3 oz fresh Nugget - 0 minutes boil - flameout
1 oz fresh Cascade - 5 minutes boil
3 1/2 oz fresh Cascade - Wet Hop in Secondary Fermenter
2 1/2 oz fresh Nugget - Wet Hop in Secondary Fermenter


Heat 8 quarts water to 165 degrees for a target mash temperature of 150 degrees. Place the 6 pounds of crushed grain (2-Row Pale, Wheat and Carapils) into a large mesh bag. Pour the hot water into the beverage cooler, then lower the grain bag into the water very slowly, pushing and prodding with a large spoon to ensure all the grain is wet (this can take several minutes). Put the lid on the cooler and allow to rest 60 minutes.

While the grains are mashing, heat another 5-6 quarts of water to 180-185 degrees for sparging (rinsing the grains). Near the end of the 60 minutes, heat 2 quarts of water to a boil in your brew pot.

After the first mash is complete, remove the cooler lid and open the spigot to draw off about 2 quarts of wort into a large pitcher. The first few draws will likely be cloudy with grain particles; pour it gently back into the cooler over the grain bag to help filter it. Draw off the remaining wort by the pitcher-full and carefully pour that wort into the boiling water in your brew pot; continue until only a trickle of wort leaves the spigot. Pour about 5 quarts of your hot sparge water over the grain bag in the cooler. Gently lift the bag up and down to thoroughly re-wet the grains (but don't slosh). Cover and let sit about 5 minutes. Use the spigot and a pitcher to draw off all of the second wort and add it to your brew pot. (Alternatively, heat the sparge water to 195 and carefully add it a pint at a time while you draw off the first wort. Keep the liquid level 1 inch over the grain bed until all sparge water has been added, then slowly draw off the remainder.)

You should have about 3 gallons of wort. Bring the wort to a boil, add 2-3 drops of anti-foam (optional) and add the whole, fresh hop flowers according to the schedule. With 20-25 minutes remaining in the boil, begin adding the DME one cup at a time, stirring to dissolve. Stir in 1 tablet Whirlfloc. At time zero, carefully stir in the last of the hops, remove from heat, cover and let sit 10-15 minutes.

Move brew pot to an ice bath and cool quickly to less than 80 degrees. Strain off the hops then transfer wort to a primary fermenter. Add water to reach the 5 gallon mark. Swirl vigorously then pitch the yeast.

Ferment in primary for 1 week, then transfer to secondary. After 3-7 days, add 3 1/2 oz whole, fresh Cascade hop flowers and 2 1/2 oz whole, fresh Nugget hop flowers. Bottle or keg after fermentation is complete (1 to 2 weeks in secondary).

Monday, October 4, 2010

Some More Dishes With Fishes

As we mentioned a few months ago in our first "Dishes with Fishes" post, we've been eating a lot more fish lately - mostly because of the fantastic quality we get from Catalina Offshore Products.

Here are some dishes we've made with our recent purchases at COP.

Pan-cooked Grouper with Sesame Noodles

In the past, we've generally made this dish with salmon. We haven't been eating much salmon lately, so we gave it a try with grouper and it was fantastic! Grouper is fast becoming one of our favorite fishes.


Black Bass with Corn and Caramelized Onions


This dish is from the Balthazar Cookbook, one of our favorite sources of fish recipes. The sweetness from the fresh corn, caramelized onions and roasted red peppers acted as a great complement for the fish.


Halibut with Garlic Sauce

We got this recipe from CAB Cooks and it is a good one. While she uses red snapper, this rendition was done using halibut and we've also made it with sea bass.


Sculpin with Coriander-Lime Butter


Not the beer, the fish. The coriander-lime butter was an experiment that turned out really well.


Grilled Swordfish
Grilled Swordfish

Just a straight-up grilled piece of fish. When you have a quality source product, you don't need to do much to it. The tomatoes and lettuce in the salad were fresh from our garden (yay!).


Rock Cod with Gnocchi "Worms" in Tomato Sauce

The rock cod went beautifully with Mario Batali's Basic Tomato Sauce - which has been our go-to house red sauce for about a decade now. The gnocchi were from a recipe at La cucina di Cristina, and they added a fun textural contrast.