Tuesday, July 31, 2007

Gazpacho


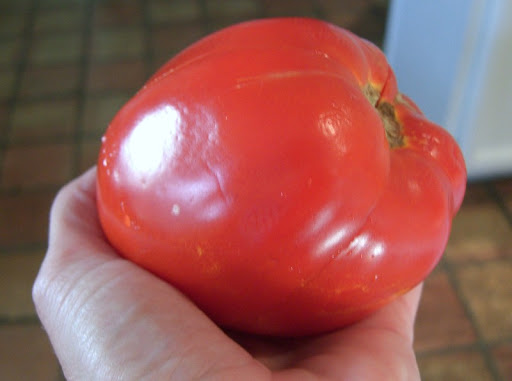
After a nice lunch of Santa Maria style BBQ tri tip at a Slow Food San Diego event with our friends Arne and Gisela, we were treated to a few glasses of Gisela's home-made white wine out on the deck overlooking their beautiful vegetable garden. Gisela was kind enough to send us home with some just picked produce. She has monster-sized roma tomatoes growing, and gave us one along with a nice cucumber. Gazpacho for dinner it was!


We have made gazpacho from a number of different recipes over the years. Our current recipe of choice is adapted from Tapas: A Taste of Spain in America, by José Andrés. It omits the bread component making it lighter than others, and we enjoy the crunch and freshness of the "garnishes".
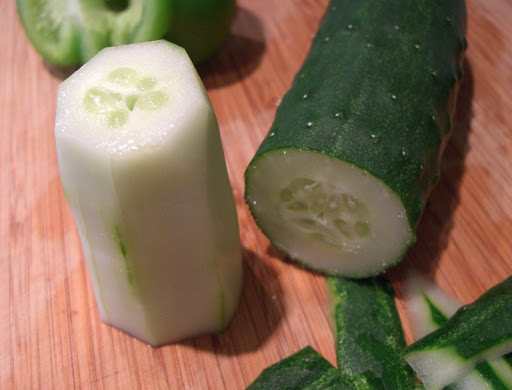


Ours has extra cucumber and green pepper, and uses red wine vinegar rather than sherry vinegar. We've found that these changes make the soup brighter and more refreshing on a warm summer evening.
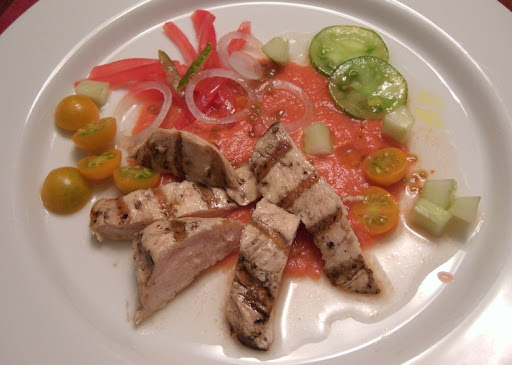


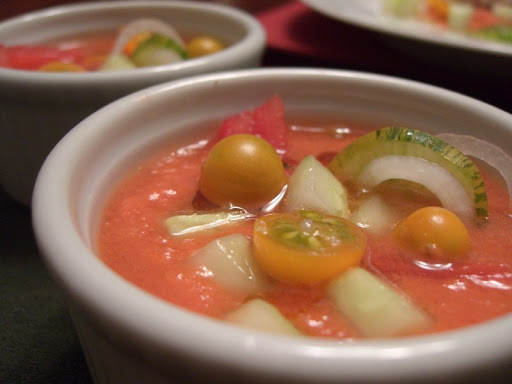
This time we had the gazpacho two ways: as a kind of a sauce which we had with some simple chicken cooked on the grill, and also as a cup of soup by itself. Plating it as a sauce really highlights the "deconstructed" nature of the gazpacho with its garnishes.
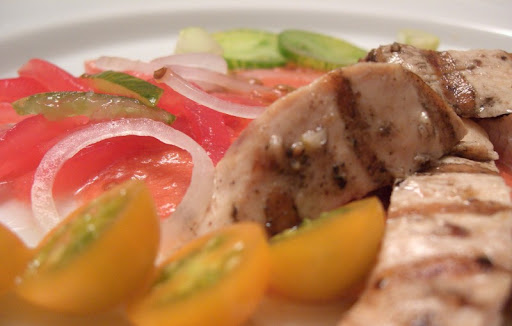


The recipe here is quite specific about the particular tomatoes we used, but we do it differently every time...

Gazpacho

Makes 4 half-cup servings. While this soup can be made in a food processor, a blender does a better job of creating a smooth puree and incorporating the oil for a more pleasing texture.

For the soup:
10 ounces ripe tomatoes (3-4 plum tomatoes -- or 1 massive roma)
5 ounces cucumber, peeled (about 1/2 cucumber)
2 ounces green bell pepper (about 1/4 bell pepper)
1/2 garlic clove
2 1/2 teaspoons red wine vinegar
2 tablespoons water
2-3 tablespoons extra virgin olive oil
1/2 teaspoon kosher salt

For the garnish:
2 ripe plum tomatoes
12 small cherry tomatoes
1 small zebra striped green tomato (optional)
1/2 cucumber, peeled
2 pearl onions, thinly sliced into rings
1 teaspoon red wine vinegar
2 teaspoons extra virgin olive oil

Cut the tomatoes and green bell pepper into large chunks -- discarding the cores -- and place into a blender. Remove some of the seeds from the cucumber, then chop it into large pieces and add it to the blender. Follow with the garlic, vinegar, and water, then puree in the blender until fairly smooth. Add the olive oil and salt, then puree again. The liquid will turn pinkish rather than red and should thicken somewhat. Taste and add additional salt or vinegar if desired. Chill in the refrigerator for at least 30 minutes.

Prepare the garnishes as follows.
Cut a slice off the top and bottom of each plum tomato, then cut in half lengthwise and remove the seeds. Using a sharp knife, remove the tomato skins by slicing horizontally, keeping the blade flat against the skin and cutting board. Square up the edges of the tomato flesh and slice into strips.

Cut the cherry tomatoes into halves, and slice the zebra striped tomato into thin disks.

Remove the cucumber seeds and cut the flesh into evenly sized 3/8-inch cubes. Drizzle with vinegar and chill until ready to serve.

Just before serving, give the gazpacho a quick stir or pulse of the blender. Put a scant half-cup of soup into each of four 4-oz shallow ramekins. Arrange a few strips of tomato flesh, 6 or 7 cucumber cubes, 6 cherry tomato halves, 1 or 2 slices of the zebra striped tomato and a few onion rings in each serving. Drizzle with olive oil and serve immediately.

Saturday, July 21, 2007

Huevos Verdes - Eggs with Roasted Tomatillo Salsa


Our friends Elise and Tom recently asked for this recipe, so it seemed appropriate to make it for breakfast today and put it up on the blog.

Huevos Verdes all starts with really fresh eggs. We're lucky enough to get ours from the "Ramona Egg-Lady" at our local Farmer's Market. We like the extra-large free-range browns -- they're simply beautiful to look at and taste fantastic.

The "verde" in the recipe title comes from using roasted tomatillo salsa as a base for the sauce that goes over the eggs.


Fresh green tomatillos and spicy serrano chiles are cooked under the broiler until blackened and soft, and then blended up in the food processor. The tomatillos give the sauce a nice tangy base, and the chiles give it extra flavor and some heat.


We've had mixed experiences with the tortillas used for our standard huevos rancheros. Sometimes they're stiff and tricky to cut with a fork. We experimented for this recipe, and came up with the idea of putting a layer of melted cheese between two corn tortillas -- sort of a mini quesadilla under the eggs and sauce.


This morning, we finished things off with cumin spiced black beans and chunks of avocado. Perfecto!


Huevos Verdes
Serves 4.
1 recipe (approx. 2 cups) Roasted Tomatillo Salsa
1 (7 oz) can whole green chiles, rinsed and diced
1/2 cup chicken broth
8 corn tortillas
3/4 cup (3-4 oz) shredded jack, mozzarella or queso anejo cheese
8 large eggs
2 teaspoons butter
1 ripe avocado, diced (preferably Haas)
2 ripe plum tomatoes, diced
2 tablespoons chopped fresh cilantro

Preheat the oven to 300 degrees.

Pour the Roasted Tomatillo Salsa into a small sauce pan. Add the diced green chiles and chicken broth and bring to a low simmer. Taste and adjust seasoning (salt) if required.

Lightly oil a baking sheet. Place four tortillas on the sheet and top with about half of the cheese (about 1/2 oz on each). Place in the oven until the cheese just begins to melt, about 3-5 minutes. Top each with a second tortilla and sprinkle with a few drops of water. Return to the oven for another 3-5 minutes. Keep warm while cooking the eggs, but don't let the tortillas dry out.

Heat a 10-inch non-stick fry pan over medium-high heat. Melt the butter in the pan and add the eggs. After the whites begin to set, pour about 2 tablespoons water along the edge of the pan and cover with a lid. Reduce the heat and cook 1-2 minutes until the whites are set, but the yolks are still runny.

Place one tortilla stack on each of four warmed plates. Spoon a little sauce over the tortillas, then place two eggs on each. Top with about 1/3 cup sauce per plate and garnish with the extra cheese, avocado, tomato and cilantro.

Serve immediately with Cumin Black Beans along side. (Extra sauce can be refrigerated for up to one week.)


Roasted Tomatillo Salsa
Makes about 2 cups. Adapted from Mexico One Plate at a Time by Rick Bayless.
1 pound (10 to 12 medium) tomatillos, husked and rinsed
3 fresh hot green chiles (such as jalapeno or serrano)
10-12 sprigs fresh cilantro, roughly chopped (thick stems removed)
1/2 cup finely chopped white onion
1/2 teaspoon kosher salt

Preheat the broiler. Place the tomatillos and chiles on a baking sheet 4 inches below the hot broiler and roast about 5 minutes or until darkly roasted and blackened in spots. Turn them over and roast another 4 to 5 minutes. Tomatillos should be splotchy-black and softened. Cool slightly, then transfer tomatillos, 2 chiles and any juices to a blender or food processor. Add cilantro, 1/2 cup of water, 1/2 teaspoon salt then blend to a coarse puree. Taste. For more heat, add the extra chile and blend again. Scrape salsa into a bowl, add the onion and stir through. Taste, and adjust seasoning if desired. Salsa can be used as is, served with tortilla chips, or modified into an assortment of vibrant, flavorful sauces.

Cumin Black Beans
Serves 4 to 6.
2 teaspoons olive oil
1/4 cup finely chopped onions
1-2 cloves garlic, minced
1/2 teaspoon kosher salt
1/2 teaspoon ground cumin
2 canned, whole green chiles, rinsed and diced (optional)
2 cans black beans, drained and rinsed
1/3 cup water

Heat a saucepan over medium. Add olive oil, onion, garlic, salt and cumin. Cook, stirring occasionally about 5 minutes or until onion has softened. Stir in green chiles (if using), beans, and water. Bring to a simmer. Using the back of a spoon, mash about a quarter of the beans against the side of the pan and stir them through. Keep warm until ready to serve. Taste for seasoning just before plating.

Friday, July 20, 2007

Tomatoes! A Pesto Pasta Salad Recipe


After stingily granting us one or two fruit at a time for the past month or so, our tomato plants have decided to go nuts recently.


We have been growing three different types this year -- some tiny orange cherry tomatoes, some yellow pear tomatoes and some green zebra stripe heirlooms. The small size is key, as we are growing them in pots in our not-at-all-large patio.


Last night we decided that we needed to use some of the little guys so that they didn't go to waste. The solution -- Pesto Pasta Salad. Our most common pesto departs from tradition somewhat, using arugula and spinach instead of basil, and almonds instead of pine nuts.


We vary the exact ingredients we put in, but the recipe here is pretty typical. This time we grilled some salmon and flaked it in at the end.


Pesto Pasta Salad

Serves 4.
For a satisfying main dish, add cooked salmon, shrimp or tuna.

1/2 cup Arugula Pesto
2 cups (6 oz) cauliflower, cut into bite-sized florets
8 oz farfalle pasta (bowties)
1/4 cup thinly sliced onions
1/4 teaspoon kosher salt
1 1/4 cups (6 oz) cherry tomatoes, halved
Red wine vinegar, to taste

Bring a large pot of water to a boil and add salt (2-3 teaspoons). Cook the cauliflower florets in the salted water for 3 minutes or until just tender. Scoop out and place into a large bowl.

Cook the farfalle in the same water for 11 minutes or until al dente. Drain, and rinse briefly to cool the pasta. Add the farfale, sliced onion, and pesto to the cauliflower. Mix gently, but thoroughly to evenly distribute the pesto. Sprinkle on the 1/4-teaspoon salt and fold in the tomatoes.

Taste for seasoning and mix in a couple teaspoons of red wine vinegar to perk up the flavors if desired.

Variations

Instead of cauliflower and tomatoes, try slices of cooked yukon gold potates and blanched baby green beans


Arugula Pesto

Arugula pesto keeps its bright, vibrant green color much better than its basil counterpart.
You can use extra virgin olive oil if you'd like, but strongly flavored versions have a tendency to over-power the flavors of the arugula and cheese.
Makes about 1 cup.

2 cups tightly packed baby arugula
1 cup tightly packed baby spinach
1-3 tablespoons sliced almonds
1 clove garlic
1/3 cup olive oil
1/2 cup (2 oz) finely shredded Pecorino Romano
1/4-1/2 teaspoon kosher salt

Put the garlic into the bowl of a food processor and pulse to mince. Add the almonds and process finely. Pack the arugula and spinach into the bowl. Pulse about 30 seconds to finely chop the greens, scraping the sides of the bowl for even processing. Pour in most of the olive oil and blend to mix. Add the Pecorino Romano and salt. Pulse to incorporate, but don't over mix or the bright green color will turn cloudy. Add additional olive oil if you'd like a saucier, looser version.

Thursday, July 19, 2007

Homemade Pancetta

Homemade Pancetta

We recently bought a copy of Michael Ruhlman and Brian Polcyn's Charcuterie. We have been making our own fresh sausages for a while now, and wanted to try our hand at some cured meats. Many of the recipes require low-temperature curing, however - something difficult for the home charcutière, and completely out of reach for us given our Southern California condo lifestyle.

Enter pancetta. Pancetta is Italian bacon, and is cured but not smoked. It is one of the recipes in the book that has a short open-air drying time, and is reasonably temperature tolerant. We often run across recipes calling for pancetta cut into lardons or cubes, but the only pancetta we see in our local stores is very thinly sliced and packaged in tiny amounts (4 ounces or less). We've purchased larger chunks from specialty stores, but found only poor quality versions, without the full flavored complexity so touted by pancetta lovers. Some recipes indicate that "any good quality bacon can be substituted," but American style bacon is so characteristically smoky that it can be overpowering if that's not what you are looking for in a dish.

So, first step: Pink Salt. We ordered our pink salt (DQ Curing Salt) online from Butcher & Packer Supply Company. You can also order it from The Sausage Maker Inc. (Insta Cure #1), but shipping to California was less expensive from Butcher & Packer, so the decision was made.

Homemade Pancetta

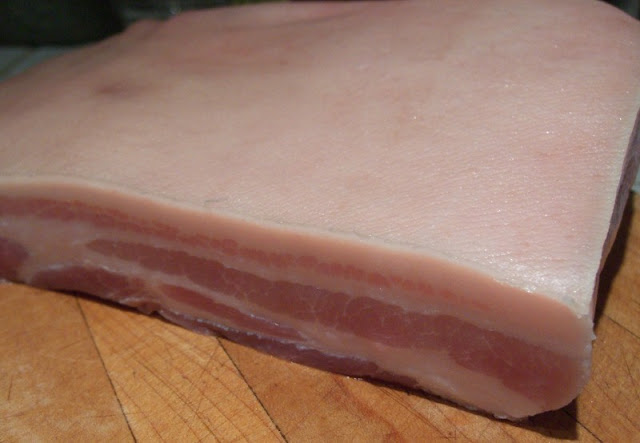
Second step: Pork Belly. While our standard supermarkets here at the beach don't readily offer slabs of pork belly at the meat counter, Ranch 99, a large Asian oriented supermarket just a few miles away does. They didn't offer any large sized slabs, but at just under 3 pounds, I determined that one belly would be plenty for our household of two.

Third step: Trimming. Our belly came "skin on" so I pulled out a sharp knife and carefully separated the skin from the fat layer. Occasionally I would accidentally cut through the skin, but I wanted to be sure to leave the fat as intact as possible. (I wish we had used the skin for something later, but unfortunately, we weren't inspired in time, so it went to waste.) Our belly was fairly neatly cut already, so I only had to trim a bit off one side to square it up.

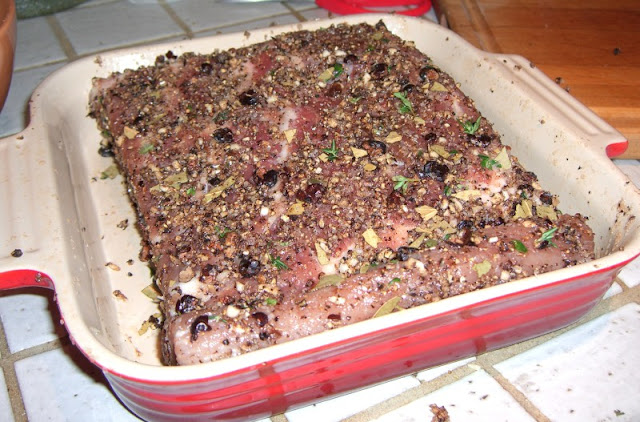
Step four: Seasoning. Our dry cure mixture included pink salt, fresh garlic, kosher salt, light brown muscovado sugar, black pepper, crushed juniper berries, crumbled bay leaves, freshly ground nutmeg, and fresh thyme leaves. I mixed it all up and rubbed it all over the pork belly, pressing it into the flesh and fat layer as evenly as possible. Then we covered the dish with plastic wrap and popped it into the refrigerator to cure.

Homemade Pancetta

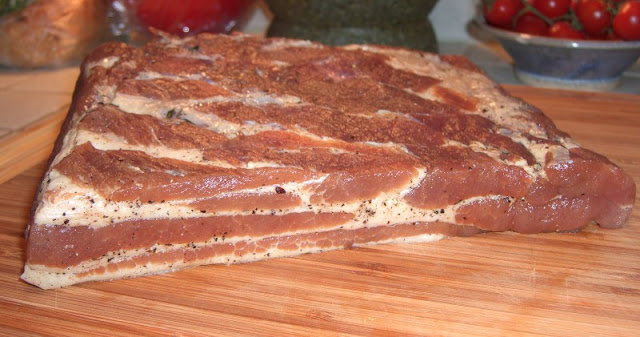
Step five: Curing and Waiting. Over the next several days, the cure caused liquid to come out of the meat and pool around the slab like a brine. We turned the belly every other day and rubbed it gently to redistribute the cure and seasonings. I checked it after a week, but decided to leave it another 24 hours to firm up a bit more. On the eighth day, the meat seemed ready -- of course this was a guess, given that neither of us had done any curing before, but we went with it. We rinsed the belly under cold water to remove the dry cure, and then pat it completely dry.

Homemade Pancetta

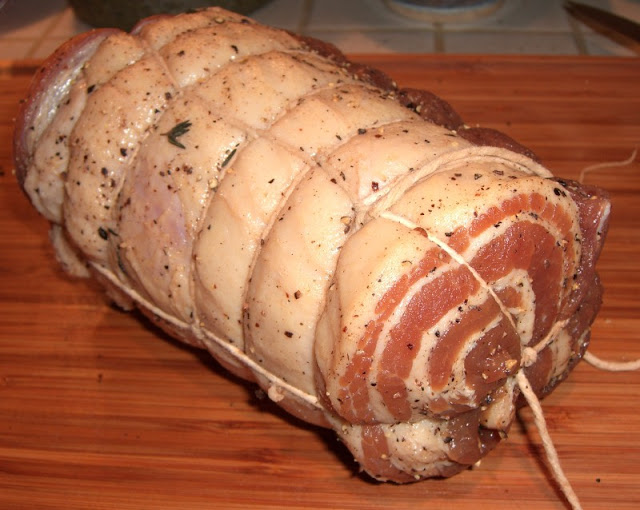
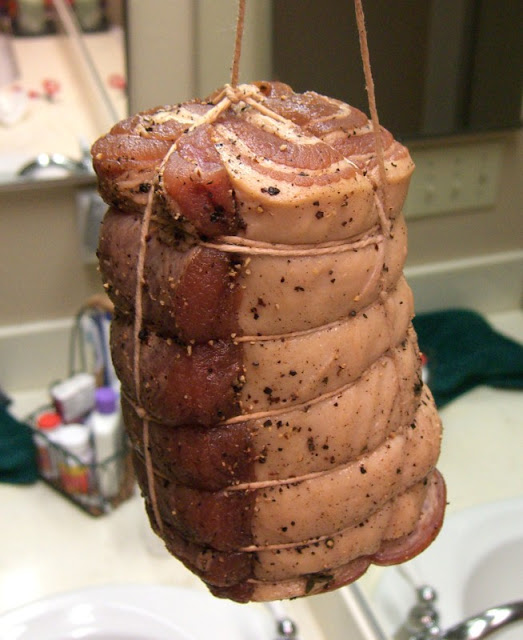
Step six (we're getting there...): Rolling and Tying. This step was a bit of a challenge. The goal is to get it tightly rolled without any air pockets inside. After sprinkling the meat side with plenty of coarsely ground black pepper, I made several attempts at rolling it up. Ultimately we found that putting the larger end of the slab inside the roll created a neater looking and more compact shape when all tied up. I may have gone overboard with my twine and knots, but as indicated in the book, "it can't be too tightly rolled."

Homemade Pancetta

Seventh step: Hanging. When we started to dry-cure our pancetta, our temperature was 70-75 degrees and the humidity was about 57%. (Optimal is 50-60 degrees with 60% humidity.) Nonetheless, we let our pancetta hang quietly in the dark for eight days, using our guest bathroom as a dry-curing room. It probably could have gone a few days longer, but we were uncertain about the high temperature.

Homemade Pancetta

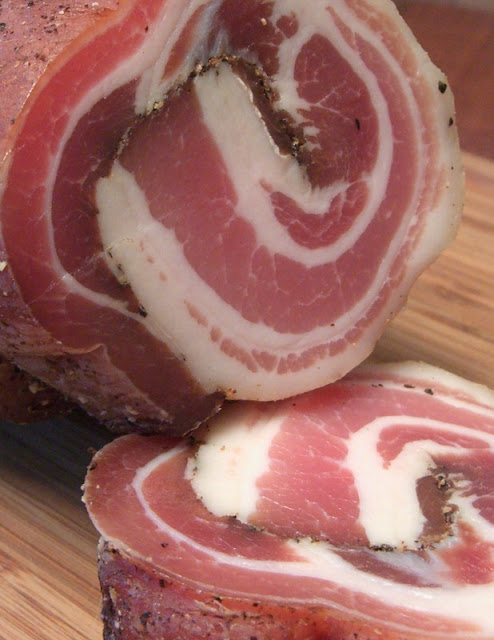
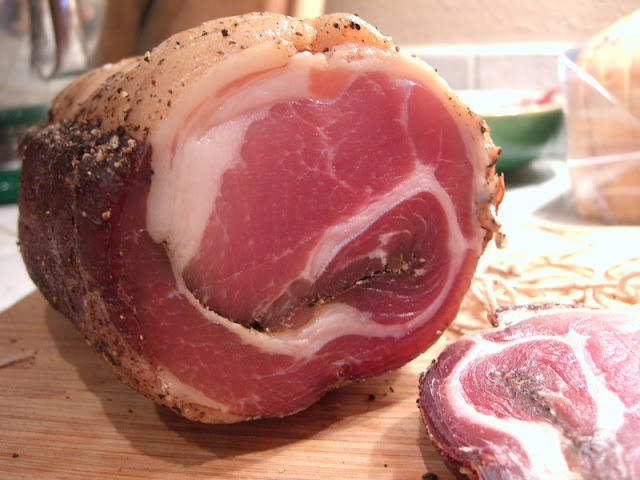
Finished! Our final product, homemade pancetta turned out perfectly. We have already used it for lardons in salad, and a carbonara is definitely on the agenda soon...

Homemade Pancetta

Friday, July 13, 2007

Prosciutto and Arugula Grilled Pizza


One of our favorite things to do in the summer is barbecue, and one of our favorite things to barbecue is pizza. If you don't have a pizza oven or a tandoor oven (and I'm guessing you don't), the best way we have found to make good flatbread is on the barbecue. It works much better than using a conventional oven, even if you use a pizza stone.

Arugula and prosciutto is a classic combination. If you look at the photo closely however, you may notice that there's watercress, not arugula on the pizza. We were out of arugula, but the watercress worked nicely as would any slightly peppery green.

One of the best things about this pizza is that instead of a sauce, caramelized red onions form the base. They're savory, but slightly sweet, and sort of melt away when you take a bite.


When it comes to dough, we're usually lazy. Trader Joe's sells some very good plain pizza dough (they also sell an herbed version, which is useful if you are just making flatbread as a side). We generally make two pizzas with one batch of dough.


We use our gas grill since it's convenient and very easy to control. We heat up both sides to get it hot, hot, hot, but then turn off one side for perfect indirect cooking. The resulting crust has a tender, chewy interior with a lightly charred, toothsome exterior.

Prosciutto and Arugula Grilled Pizza

The ingredient list is enough for 1/2 a batch of prepared dough.

Pizza dough
1 (8 ounce) red onion, halved and cut into 1/4-inch half-moons
2 tablespoons olive oil, plus extra for brushing the dough
2 ounces mozzarella cheese, thinly sliced
2-3 thin prosciutto slices, torn into rough pieces
1 handful baby arugula
1/2 ounce shaved Parmigiano Reggiano
1-2 pinches Kosher salt


On a lightly floured surface, shape the dough into a ball and let rest 20 minutes.

Heat a saute pan over medium heat. Add the 2 tablespoons olive oil, onion and a pinch or two of salt. Cook, stirring occasionally until the onion is soft and lightly browned, about 30 minutes.

After the dough has rested, shape it into a thick disk, about 4 or 5 inches across. Let rest another 10-15 minutes.

Make sure the barbeque grill is very hot. When ready to grill, turn the heat off on one side. Stretch the dough gently and evenly into a rough round about 8 or 9 inches across, then brush with olive oil. Carefully lay the dough on the grill, oil side down, away from the flame. Bake covered for 5 minutes, then using tongs, rotate dough a quarter-turn and cover again.

After another 5 minutes, turn on all burners again. Brush the dough with olive oil and pat down any large bubbles. Flip the dough over onto the hotter side of the grill, then turn off the heat under the crust. Spread the onions and mozzarella around the crust and bake, covered for 5-8 minutes. Scatter the proscuitto, arugula and parmigiano over the pizza, then close the lid for another 2 minutes.

Slide the finished pizza onto a small cutting board. Let rest 3-5 minutes, then cut into wedges with a sharp knife. Serve hot or at room temperature.

Preparing the grill

When the bbq is hot and just before it's time to cook, make sure the grill grates are quite clean (scrub with a metal brush if necessary) and oiled. I normally grab a wadded-up paper towel with metal tongs, dip the paper into a small dish of canola oil and quickly rub it over the grates. Rotate the towel and dip again as needed. Work quickly to keep the paper from igniting.

Monday, July 9, 2007

Anticuchos


I first heard about Anticuchos on a Chowhound thread about a new Peruvian restaurant here in Pacific Beach called Latin Chef. Anticuchos are grilled meat skewers, generally made out of beef heart and marinated using South American aji chilis.

While shopping at Northgate market (a large, Mexican-centric supermarket), I happened across a jar of aji paste. They also had nice looking beef heart, so anticuchos seemed destined to happen.


The Aji paste we bought is from Peru, and contains only aji amarillo chilis, water and salt. It smells awesome and is quite spicy.


For the recipe, we mostly followed what we saw in this video from the Instituto de los Andes. There were numerous other recipes available online, some excluded annatto seeds, and marinade times ranged from 2 hours to 2 days, but all used a spicy chili paste, garlic, cumin, and plenty of vinegar. We marinated our beef heart about 10 hours (all day), grilled it with some corn and served it with simple, boiled potatoes. The meat came out medium-rare and had great texture. The flavor from the aji marinade was really nice. We are thinking of trying it on other kinds of meat -- maybe a nice flank steak.

Anticuchos
1 pound beef heart
2 teaspoons olive oil
1/2 teaspoon annatto seeds
2 garlic cloves, minced
1 1/2 tablespoons aji paste
1/4 teaspoon salt
1/4 teaspoon ground cumin
1 pinch black pepper
1 teaspoon oregano, rubbed
1/4 cup red wine vinegar
Trim beef heart well, removing all fat, valves and membranes. Slice into 1/2 inch thick pieces, about 1 inch wide and 2 inches long.

Gently heat the annatto seeds in the oil 2-3 minutes, or until oil is colored red. Discard seeds, allow oil to cool.

In a small bowl, stir the remaining ingredients together and mix well. Place the heart into a non-reactive bowl and pour the marinade over. Add the annatto oil and stir throroughly to evenly coat the heart pieces. Cover and refrigerate at least 8 hours or overnight.

After marinating, thread the meat onto skewers. Cook on a hot barbeque grill, about 2 minutes per side, or until just cooked through (medium, not well done). Brush the meat with marinade several times while cooking. Serve with lightly grilled corn on the cob and simple boiled potatoes.

Sunday, July 1, 2007

About Menu In Progress

We are Mike and Sherry and we're located in San Diego (Pacific Beach, to be more precise). We are avid consumers and producers of food and beverages. This blog gives us a place to share our culinary adventures with family, friends and anyone else who stops by. You can contact us at: