On the Importance of Late Extract Addition
Update: While late extract addition is a very important technique, particularly with all-extract brewing, going to partial mash makes much more of a difference. You can check out our partial mash IPA post here.
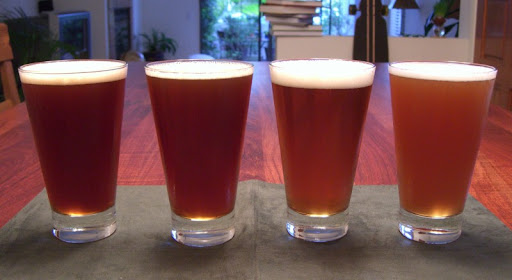
In an earlier post on San Diego Pale Ale, we mentioned our progression toward brewing a beer in this style. The other day, we opened up bottles of each of our four batches in this series to compare taste and color. Above, you can see the color progression from our first batch on the left to our most recent on the right.
Batch #1. Our first attempt. It was made pretty much directly from an American IPA recipe we got from Home Brew Mart. It used all liquid light malt extract and Centennial hops both during the boil and for dry hopping. The yeast was White Labs Burton Ale Yeast. The beer came out darker than we would have liked, and had a caramelized malty overtone to the taste. Not a problem if you were trying to make a nut brown ale, but we were after an IPA.
Batch #2. We noticed that a number of the beers we really liked were featuring two relatively new hop varieties: Simcoe and Amarillo. In fact, the two varieties are the duo in Alpine's Duet, one of my absolute favorites. For this batch, we switched hops from Centennial to a pretty even mix of Simcoe and Amarillo. Additionally, to try to combat the dark color, we used a lighter crystal malt for steeping (20L instead of 40L). The beer did come out lighter, although not significantly so. In terms of style, we really like the different in aroma that we got from the new hops, but the taste was still overpowered by the maltiness (we've since used it to cook Beer-Braised Lamb Shanks, which worked great).
Batch #3. Figuring that we had the hops down, we decided to really try to combat the dark color in this batch. Doing some research, we found out about late extract addition. The idea is that your malt extract has already been boiled - it just needs to be brought up to temperature long enough for sanitation. The boiling period is primarily for hop extraction, so in order to avoid over-caramelization of the wort, you add the majority of the malt extract near the end of the boil. In addition to using late extract addition for this batch, we also switched from liquid malt extract to dried. I find that liquid extract tends to impart a certain "home brew" taste to the beer. Additionally the dried malt extract starts out lighter in color, so combined with the late addition we were hopeful. The final difference was switching to White Labs California Ale Yeast. The result: a much lighter beer, and the first one we were really happy with.
Batch #4. For this batch, the idea was to perfect the recipe and further improve upon what we were already happy with in the previous batch. We added an extra pound of dried malt extract to go for a more high alcohol beer (I find that my favorite examples of this style fall in the 7-8% range) and we were even more aggressive with the late extract addition, adding nearly all of it at knockout, off the heat. Finally, we went even more overboard with our dry hopping, adding a bunch more Simcoe and Amarillo several days before bottling.This batch came out even better than #3, and we are looking forward to seeing how it changes with age. The full recipe for this beer can be found at the bottom of this post.

Above, you can see batches 1 and 4 compared. They taste like two completely different beers. Interestingly, the first two batches taste much more alike than either tastes like batches 3 or 4. This despite the switch to our current hop varieties of choice for batch two. It seems that the flavor of the hops just can't shine through if the beer is over-caramelized. It also seems likely that the switch in yeast to California Ale from the more English-style Burton may have been significant as well.
Tasting and trying to photograph the four batches was an evening of beer mayhem. This is what the aftermath looked like:

Batch #4
45 minute boil; very late malt extract addition; lots of dry hopping.8 lb Briess Golden Light Dry Malt Extract (DME)
1/2 lb 10L Crystal Malt
1/4 lb Carapils
1/4 lb Biscuit malt
White Labs California Ale Yeast
4 oz Amarillo Hop Plugs (9.5% AA)
4 oz Simcoe Hop Plugs (13.2% AA)
1 tablet Whirlfloc
4 1/2 oz corn sugar (for bottle priming)
Hop Schedule:
1/2 oz Simcoe & 1/4 oz Amarillo at 45-30 minutes3/4 oz Simcoe & 3/4 oz Amarillo at 30-15 minutes
1/2 oz Simcoe & 3/4 oz Amarillo at 15-0 minutes
1/4 oz Simcoe & 1/4 oz Amarillo at 0 minutes
1 oz Simcoe & 1 oz Amarillo dry hop
1 oz Simcoe & 1 oz Amarillo late dry hop
Heat 3/4-gallon water to 170 degrees and remove from heat. Place the grains (10L Crystal, Carapils and Biscuit) in a steeping bag and let steep in the hot water for 30 minutes. Add the steeping liquid to the brew pot and rinse the grain bag with 2 cups hot water over the brew pot.
Add 2 1/4 gallons water to the pot and bring to a boil. Off the heat, add 1 pound DME and stir until dissolved. Return to a boil and add hops bit by bit, according to the schedule.
At time zero, remove from heat and add remaining DME one pound at a time, stirring to dissolve. Stir in 1 tablet whirlfloc. Cover and let sit 15 minutes to pasteurize the DME.
Move brew pot to an ice bath and cool quickly to under 80 degrees. Transfer wort to a primary fermenter, straining most of the hops. Add water to reach the 5 gallon mark. Swirl vigorously then pitch the yeast.
Ferment in primary for 7 or 8 days, then transfer to secondary and dry hop with 1 ounce Simcoe and 1 ounce Amarillo. After 10 days in secondary, add the remaining Simcoe and Amarillo hops. Bottle after a total of 14 days in secondary (boil the priming sugar in 1 cup water before adding).


Hello and thank for a great blog. I'm a friend of the Mitz' up in the OC. Lady Jill turned me on to your site and have enjoyed the posts.
ReplyDeleteAbout the beer. Your're right the late malt additions do change the color by reducing cook time but that also effect flavor. It appears that your skill level has exceeded extract brewing and you need to move to the all grain world. It's a lot easier to control color, flavor, malt profiles, etc. and with your liking to experiment, the options are endless.
Great blog and cheers!
Don
Hi Don,
ReplyDeleteWe definitely have thought about all grain, but haven't had the guts yet. We want to try adding some Rye in our next batch, and since you can't buy Rye extract (at least I haven't found any) that will put us at least in the partial mash world. We'll see...
this is awesome. I can't wait to get all the ingred. and try it! thanks. I did a batch a week ago and had a Total momentary lasp of reason and forgot to add my DME at the start of the boil. turn out that I realized it about 20 min before the end of the boil. panicing and not knowing what else to do I dumped it in, stired it up and finished the boil. At the time I didnt know about late additinns. I am a NOOB. did some research the same day and ready about it, which relaxed me some. this batch is an American centennial IPA. taking a reading tonight to check the grav. thanks for the post. really good stuff!
ReplyDeleteGreat blog. I have been brewing for about 7 years, and have a huge array of brewing equipment for all grain, and still enjoy whipping out an extract beer from time to time. If you want to ease your way into all grain, try the Brew In A Bag method. Which is, essentially, using a paint bucket strainer to hold your grains in your mash tun/kettle. You steep them in the water (just like your mini mash in this experiment) and after the rest, pull the bag up. You can sparge some hot, 170 deg water through it, then you are done. Add water, boil, etc., like normal. Total investment: $4 and you are all grain brewing!
ReplyDelete