Queso Fresco - Home Cheesemaking

This Queso Fresco was our very first attempt at a pressed cheese, and it came out very well. Pictured above the day after it was made, it is completely ready to use. How awesome is that?
Our first test was to use it how we normally use queso fresco when we have it on hand: crumbled atop something. In this case, it is gracing a simple breakfast of memelitas:

The cheese added a very nice lactic and salty element to the salsa atop freshly cooked corn tortillas.
In addition to our traditional uses, this cheese has surprised us with its versatility. It melts much better than we expected, and makes for a very nice quesadilla. Given this, we decided to give it a shot as a pizza cheese. We made a simple Pizza "Margarita" (no, not Margherita - this a Mexican, not Italian cheese after all...)
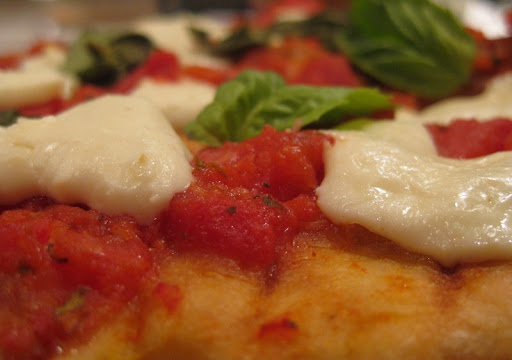
The result was quite nice indeed.
The cheese-making process is actually quite simple - like many artisanal products, it mostly takes time and a little attention to detail. For recipe guidance I've been using the book Home Cheese Making: Recipes for 75 Delicious Cheeses by Ricki Carroll. It's been a very helpful resource.
For my queso fresco I started with two gallons of organic whole milk. The thing that gives many cheeses their characteristic twang is an active culture that produces lactic acid. I used a freeze-dried version (Mesophilic A) from Leeners.com that you add directly to the milk. Since my milk was homogenized I also added a little calcium chloride to avoid an overly soft curd.
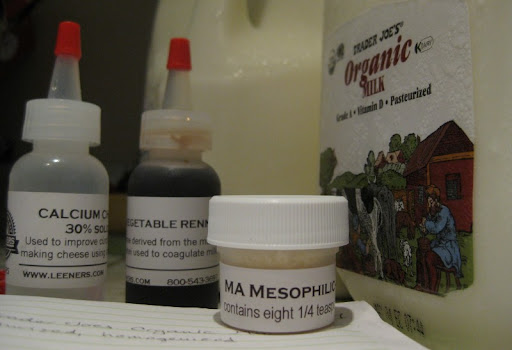
After letting the milk ripen at 90°F for 20 minutes, I stirred in some diluted rennet and let it form a reasonably solid curd - it sets up rather like a custard. Next the curd gets sliced into little cubes and the solids start to release a lot of liquid (the whey).

The cubes release even more whey and shrink significantly while you slowly increase the temperature to 95°F and gently stir them. I was surprised to learn that many cheeses use almost identical ingredients and preparation techniques, but that a few degrees of temperature variation makes the results quite different.

After pouring off as much whey as possible, it's time to salt the curd. The simplest method for ensuring an even distribution is to gently stir it and break up clumps using your fingers.

Because queso fresco is a "pressed cheese", you then need to press it. The compression requires weight, which I improvised like so:

Upon reflection, I like to think of this press as representing my three careers thus far - Microbiology, Epidemiology, and now making good food. The press worked well, apart from a few loud, startling tumbles - one of which sent the cheese flying. Fortunately, no damage was done - we do need a real press, though...
Now that I'm comfortable with the cheese-making process I'm anxious to try my hand at some hard, aged cheeses like cheddar, gouda and maybe a parmesan. But since those take several months to mature, I'm sure we'll be eating lots of tasty queso fresco in the meantime.





Wow. This is great. I've been wanting to make queso fresco for a long time, because the store-bought kind is a bit too salty for my taste. I like my queso fresco cut into slices, pan-seared, peppered, and anointed with fresh lime juice. I can eat that everyday!
ReplyDeleteDo you buy your cheese making supplies online? Also, I don't have any big books on microbiology or epidemiology. Would a classical Greek lexicon turn out equally good cheese? :)
Leela
first meat, the beer, and now cheese. you guys don't joke around. that is one nice lookin picture of cheese! very interesting post
ReplyDeleteThanks Leela and Sawyer!
ReplyDeleteLeela - I hadn't thought of pan-searing the cheese, but can see it would work well. I'll definitely give it a try!
I've purchased most of my supplies online from Leeners, and the New England Cheesemaking Supply Company. In addition to Queso Fresco, I'd guess that your classical Greek lexicon would produce a very nice Feta. :-)
Mike, that looks great! I have that book and have been meaning to get started. You've inspired me, once again!
ReplyDeleteI'm going to try your pulled pork recipe tomorrow for Derby Day.
David
Thanks for the sample, Sherry!
ReplyDeleteThe queso fresco tasted delicious on the (not so authentic) chilaquiles that I made. It was the perfect texture and flavor complement to the dish. I had to slap Jesse's hand away from the cheese more than once while I was constructing it.
Hi David, Judging from your blog posts, you guys are going to really enjoy making cheeses. We're just beginning, but Mike and I are having a blast with it so far.
ReplyDeleteHi Corinne, Thanks for stopping by! I'm glad to hear that you guys put the queso to good use. This kind of positive feedback just might get you on the short-list for more samples. Was that your plan? :-)
I love Queso Fresco ! Amazing job I admire your efforts.
ReplyDeleteI've just acquired my first bottle of rennet (eBay....source of everything that's just a little bit weird), and I'm gearing up to make my first cheese.
ReplyDeleteI've found this link quite useful:
http://biology.clc.uc.edu/fankhauser/Cheese/CHEESE.HTML
There are instructions in there on how to fashion your own DIY press, which would probably be a bit more stable than your stack of books, although I love the fact that you used suitably weighty tomes for weighty purposes they probably weren't intended for.
I'm starting with a yoghurt, to get used to handling milk, thermometers, techniques and the like, but I think my first cheese proper will be a labneh.
Thanks Masa!
ReplyDeleteHi Rich, Yoghurt -- and a subsequent yoghurt cheese -- sounds like a great way to start.
I too have found Prof. Fankhauser's site helpful, especially the photos. Although I didn't use his design, we have since improved upon the press set-up somewhat (more on that in a later post). Very important if we want to press a cheese overnight without crashes!
I am very interested in the exact recipe (how much starter culture, how much calcium chloride and such). Could you send it to me, please? Thanks a lot in advance!
ReplyDeleteI used the basic recipe from Home Cheese Making: Recipes for 75 Delicious Cheeses by Ricki Carroll. The Mesophilic A starter culture was from Leeners and I used 1/4 teaspoon for the 2 gallons of milk. Same for the calcium chloride and liquid rennet (1/4 t each). Be sure to use enough salt -- the recipe indicates 2 tablespoons, but I found it needed at least 2 1/2 T.
ReplyDeleteI've got my favorite recipe, given to me directly from a cheesemaker in Brazil. This cheese is called there "Minas Cheese", which is very popular in the Minas Gerais state.
ReplyDeletePlease use the translator and if you have any qestions, leave a comment! Thanks!
http://pinguimdgeladeira.blogspot.com/2010/04/queijo-minas-feito-em-casa.html