Monday, April 26, 2010

Uni and Eggs

Uni and Eggs

When Sherry went by Catalina Offshore Products this past Friday to pick up some fish (grouper and yellowtail - both were fantastic) she also grabbed a tray of uni. I'd been looking forward to trying uni for some time now  - admittedly with some trepidation, as I find the idea of eating sea urchin gonads a bit off-putting.

This is what the uni looks like in the wooden tray it comes in:

Uni from Catalina Offshore Products

The verdict? At the risk of losing what foodie street-cred I may or may not have, I have to confess that I'm not a fan. We first tried them straight-up. I can see why lots of people like them - they have a sweet, rich taste of the sea about them. But I just couldn't get past the texture.

We also gave them a try in eggs - with much the same reaction from me, I'm afraid. And while Sherry liked it considerably more than I did, I don't think uni is going to find a regular spot in our rotation. The offal in our eggs is more likely to come from larger creatures.

For some more positive takes on local uni, have a look at this post from Dennis, and this one from Kirk.

Tuesday, April 13, 2010

A Visit to Suzie's Farm

Suzie's Farm

Who knew that there was an operating farm in San Diego County west of I-5? We certainly didn't, but we do now. This past Saturday, Slow Food Urban organized a visit Suzie's Farm, an organic farm located just south of Imperial Beach in the Tijuana River Valley.

Pimping some freshly uprooted carrots in the picture above is not Suzie (although she gets asked that a lot). It is Lucila De Alejandro, who operates the farm with her husband Robin Taylor. Suzie was their dog. Well, kind of. Suzie was a Norwegian Elkhound that lived wild in the valley, and later with them.

And the property we visited wasn't strictly Suzie's Farm. It is "Kiki Town" - a 40 acre parcel of land right nearby their original farm location that they have been farming since last July. Why "Kiki Town"? Named after one of their current Norwegian Elkhounds, of course.

Right now the farm is harvesting the tail end of their winter and spring planting and are getting geared up for summer. Below you can some of the of thousands and thousands of tomato plants in numerous varieties that they've started:

Suzie's Farm

Or are they nettles :-) By touring the fields and observing, it became immediately apparent that one of the challenges of growing organic crops near the sea in San Diego is that nettles will grow almost better than anything you intentionally plant.

Suzie's Farm

The fields start nice and clean. Below you can see lovely young bean plants shooting up from beneath a soil-warming layer of black plastic (and right along side, the tender young nettle plants growing between the rows!).

Suzie's Farm

They had a very nice variety of gorgeous lettuces growing, like these green and purple leaf lettuces.

Suzie's Farm

Between the newly planted fields and the older, winter crops was a beautiful, edible "wall." One of the participants likened it to a stone fence, building up in layers. It is composed of carrots in the front (light green tops just visible here), followed by rows of black kale, swiss chard, purple mustard lettuce and finally arugula going to seed in a tall bright yellow swath. We tasted it all - the mustard leaf tasting very much like spicy mustard and the arugula intense and peppery even in its waning state.

Suzie's Farm

So many plants looked picture perfect, like this late season cabbage. Where are the worms and pests?! (Unlike my home patio garden...)

Suzie's Farm

The tour we attended included some opportunity to take home the ultimately fresh goods. We harvested rainbow chard (below), broccoli, cauliflower (had some roasted Sunday night - lovely), sugar snap peas, and a little of this and that as desired.

Suzie's Farm

All in all, it was a very pleasant couple of hours.

Suzie's Farm

Suzie's Farm has a CSA (if we weren't already very happy with our own farmers market we'd be very tempted to join), and they supply a bunch of restaurants in town.

Real people growing real food for real people. Just 20 miles down I-5 from our very urban home!

Saturday, April 3, 2010

Tunescape

Tunescape

I hope everyone will excuse a rare, non-food-related post. While eating and drinking may be my most important hobbies, I have a few others as well - including music, computer programming and video games. I just completed a project that encompasses all three.

Tunescape is an Xbox 360 game that I just published on Xbox Live Indie Games. In Tunescape, the gameplay is derived from the musical patterns of a song. The game includes nine tracks by Kevin MacLeod, but you can also play against any song in your music collection.

I have a little promo website for the game here:

  tunescape.nostaticsoftware.com

and the Tunescape page in the web-based Xbox Live Marketplace is here.

Ok, now back to the food...

Tuesday, March 23, 2010

Vegetable Pakora with Tamarind Dipping Sauce

Vegetable Pakora

It has been quite some time since we've posted an addition to our collection of Indian takeaway recipes. The main reason for this is that we live thousands of miles and an ocean away from the nearest Indian takeaway. While I can't say for certain that the specific kind of Indian food we enjoyed while we lived in Edinburgh does not exist here in the US, we definitely haven't found it.

Recently, however, we were craving Pakora - the fried gram (chick pea) flour snacks that always used to come with our takeaway curry meals. Searching the internet for recipes, mostly what I turned up were recipes for vegetables coated in a gram flour batter and then fried (kind of like an Indian take on tempura). While that sounds good, it is definitely not what we remember - the Pakora were more uniform in texture, without any large chunks of vegetables.

Finally, I came across suggestions to use grated vegetables. The light bulb in my brain went off, and we set about making Pakora.

Start with zucchini (courgette, for our readers from the UK), carrot and potato - coarsely shredded using a grater:

Vegetable Pakora

The vegetables get quickly blanched in lightly salted water and then drained. They are then mixed with some sliced onion, Serrano chile, an egg and a mixture of spices (see the recipe at the bottom of the post for details).

Vegetable Pakora

I want to take a second to highlight one element of the seasoning - fenugreek leaves (or "Kasuri Methi", as labeled at our local Indian market):

Vegetable Pakora

We discovered fenugreek leaves recently because they were called for in a recipe we were making. We've been using fenugreek seeds for a long time (they are a key ingredient in our Saag recipe), but the leaves are a relatively new ingredient for us. We really like them - they have an absolutely fantastic aroma and we need to find ways to use them more often.

But back to the recipe - the next step is to add the gram flour - enough to add body without completely losing the moistness of the mixture.

Vegetable Pakora

Then you drop spoonfuls of the batter into hot oil where they form irregular ball-shapes (bigger than a golf ball, but not by too much) and deep-fry them at 375°F until they are a dark, golden brown.

Vegetable Pakora

They come out looking like this:

Vegetable Pakora

Now onto the dipping sauce. The Pakora we got from our local takeaway always came with a tangy, dark red sauce. We didn't know what it was at the time, but have since found out that it is tamarind based.

Tamarind pulp comes looking like this:

Tamarind Dipping Sauce

After soaking it in hot water for about 10 minutes, it softens so that it can be put it through a fine mesh strainer or sieve to get a nice, smooth paste.

Tamarind Dipping Sauce

After mixing in some ketchup, roasted garlic, sugar and a bit of salt and cayenne, the sauce is ready to go - flavor-wise, at least. But it still doesn't have the characteristic reddish tinge. The solution? Red food coloring - the same kind that we use in our Chicken Pathia recipe.

Tamarind Dipping Sauce

You can certainly omit the coloring, but we like to add it to make the sauce look "right".

Tamarind Dipping Sauce

Then, all that's left is to dip and eat!

Vegetable Pakora

While it has been over ten years since our last genuine takeaway Pakora, the memory of them is still strong and I think that these are a very good step in the right direction. Any suggestions on ways to make them even better are most definitely welcome.

Vegetable Pakora

Makes 12 Pakora.

Ingredients:
2 small carrots, peeled and grated
1 small zucchini, grated
1 small potato, peeled and grated
1/4 onion, thinly sliced and cut in 3/4-inch lengths
1/2 serrano chile, minced
1 egg
1 teaspoon oil
1 1/4 cups gram flour, plus more if needed
1/4 teaspoon turmeric
1 teaspoon garam masala
1 teaspoon kosher salt
1/2 teaspoon fenugreek leaves, crumbled
1/4 teaspoon cayenne
1 garlic clove, pan roasted and mashed
vegetable oil for frying (peanut or canola)

Blanch the carrots, zucchini and potato in lightly salted boiling water for 2 minutes. Drain and let cool in the strainer for 15-20 minutes.

Stir together the vegetables, onion, chile, garlic, egg, oil and spices until thoroughly mixed. Add the gram flour and blend. The batter should be fairly loose, but not runny.

Put about 2 inches of oil into a heavy, high sided pan and heat to 375 degrees. Using two large spoons, scoop some batter with one and carefully push it into the hot oil with the other. The pakora should immediately rise to the surface forming irregular ball shapes -- if it sinks, the oil is not hot enough. Work in batches to avoid over-cooling the oil and cook each pakora to a deep, golden brown color, about 5 minutes.

Serve hot or at room tempurature.


Tamarind Dipping Sauce

Makes about half a cup.

Ingredients:
1/4 cup tamarind paste
1/2 cup hot water, divided
1 teaspoon sugar
1 tablespoon ketchup
2-3 pan roasted garlic
1/4 teaspoon kosher salt
Red food coloring

Place the tamarind paste in a small bowl and add 1/4 cup of hot water. Break up the paste with a spoon, then let sit for 5 minutes. Smash the paste in the water, then force through a fine mesh strainer, pushing as much of the dissolved portion through as you can. Return the leftover seeds and skin to the bowl, add another 2-3 tablespoons hot water and let sit for another 5 minutes. Stir and strain again. You should end up with 3-4 tablespoons of smooth tamarind sauce.

Peel the garlic, sprinkle with the salt and use the side of a large knife to smash the garlic into a paste. Chop through the paste to make sure no large chunks remain, then add it to the tamarind sauce. Stir in the sugar, ketchup and enough food coloring to obtain a noticeable red color. Thin to your desired consistency with up to 3 tablespoons of cool water.

Monday, March 15, 2010

Mariscos German Truck in Ocean Beach

Mariscos German Truck in Ocean Beach

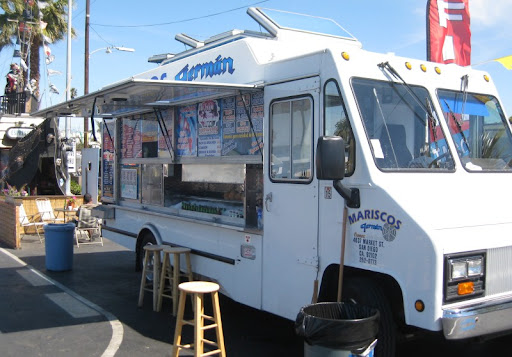
I'd heard that a new Mariscos German truck recently starting operating in Ocean Beach, so we went to check it out today for lunch. It is parked in the lot of the Apple Tree market off Cable Street between Newport and Santa Monica.

The menu will be familiar to anyone who has patronized one of the other Mariscos German trucks:

Mariscos German Truck in Ocean Beach

And the prices are (at least to my recollection) the same as well:

Mariscos German Truck in Ocean Beach

They have a nice little seating area behind the truck. Emphasis on "little", though - it is just a single table with a few chairs so you need to be lucky to get a seat. We weren't lucky, so we enjoyed our lunch curbside.

Mariscos German Truck in Ocean Beach

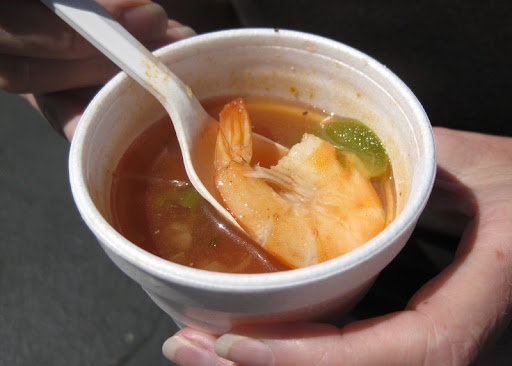
As is the case with the other trucks, when you order they give you a cup of fish soup with a shrimp in it. Unlike the soup I've had at the University & 35th truck, this shrimp came sans head. Maybe trying not to freak out the beach folk?

The University truck (which I've heard has been sold, although it currently maintains the same name) currently charges $.75 for the soup, but I saw no mention of a price at the OB truck. Regardless of price, it makes for a perfect snack while you are waiting for the rest of your food.

Sopa de Pescado

We ordered a tostada mixta, which is a huge mound of octopus, shrimp and fish ceviche topped with large slices of avocado:

Tostada Mixta

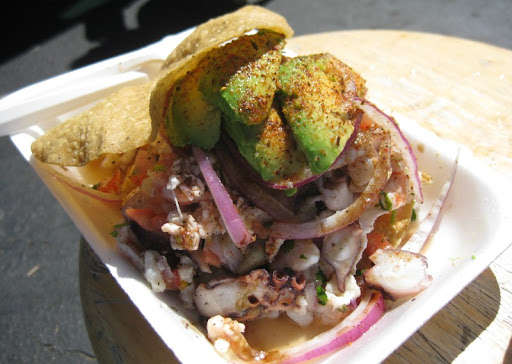
I found it a wee bit salty (and I'm a salt fiend), but the texture was fantastic - particularly the octopus. It was definitely the best thing we had.

We also got a couple of tacos, which were pretty much exact replicas of the ones we've had from the University truck. The gobernador is a daunting mound of shrimp, onions, peppers and cheese:

Gobernador Taco

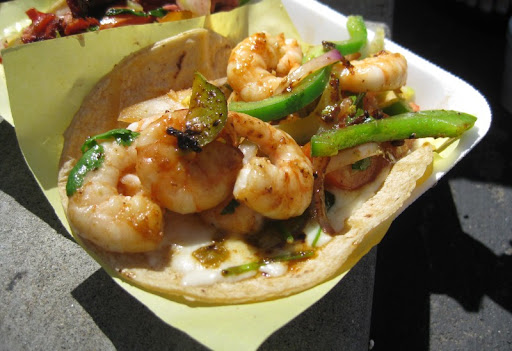
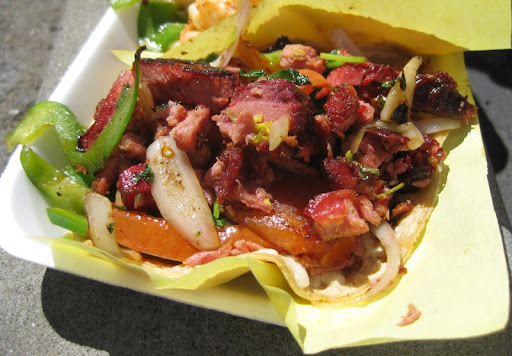
The smoked marlin taco also has peppers, onions and cheese but adds cooked tomato. And, of course, the smoked marlin, which is pretty tasty stuff:

Smoked Marlin Taco

It ended up being a bit more food than we could eat. The tostada was huge, and their tacos are also very big. Personally, I would prefer it if they made them a bit smaller. They would be easier to eat, and I could have more variety without stuffing myself to the gills. As complaints go, however, that's a pretty minor one.

All in all, the Ocean Beach truck is the same Mariscos German experience in a more convenient (for us, at least) location. It's going to be a great place to get a bite to eat before or after a few beers at either Newport Pizza or the new Ocean Beach Pizza Port.

Monday, March 8, 2010

Chile de Arbol Paste

Chile Paste

Meet my latest obsession - chile paste.

I've been making this stuff for the past several months, and we've been using it in everything. Made simply from chile de arbol and water, it is perfect for adding a deep, intense and yet neutral heat to all sorts of food. The neutrality of it is great because it is not cuisine-specific - we've used in dishes ranging from Huevos Rancheros to Mapo Tofu.

It is also super easy to make and dirt cheap to boot. A big bag of chile de arbol costs about 75 cents (we get the chiles from Northgate Market, our local Mexican mega-grocery).

Chile Paste

I destem the chiles and cut them in half to get out any seeds I easily can (no need to try to get every last seed). Then I toast them in a frying pan until they darken, but do not burn.

Chile Paste

Here they are just out of the pan:

Chile Paste

After toasting, I soak them for about half an hour in just enough hot water to cover them. I put a small plate on top to keep them submerged.

Chile Paste

After soaking, they get blended with enough of the soaking water to make the blender "catch". I find that starting on low power and then increasing it makes it less likely to spew all over the inside of the blender. Also, be careful not to open the top of the blender until it has completely stopped. I learned that lesson the hard way - chile de arbol in your eyes is not a good thing...

Chile Paste

Blend until the consistency is very smooth, and voila - you've got chile paste!

Chile Paste

In addition to being a great ingredient on its own, it also provides a perfect base for making taco shop hot sauce.

Chile Paste

Makes about 1 cup.

Ingredients:
1 1/2 ounces chile de arbol
Water

Destem the chiles and cut them in half, removing any seeds that shake out easily.

In a frying pan over medium high heat, toast the chiles while constantly stirring them around until they darken but do not burn (about 5 minutes). If your stove has an exhaust fan, you may want to use it.

Place the toasted chiles in a large bowl, discarding any seeds that fell out during the cooking process. Add enough hot water to just cover the chiles, and put a small plate on top of them to keep them submerged. Soak them for about a half hour.

Remove the chiles from the soaking liquid, and place them in a blender with enough of the soaking liquid to allow blending (about 1/2 to 2/3 cup).

Blend first on low power, and then on high until you have a smooth paste.

Tuesday, February 16, 2010

Pizza Port in Ocean Beach

Pizza Port in Ocean Beach

Update: Pizza Port Ocean Beach is now open!

Why am I posting a picture of a partially constructed building? Because Port Brewing, one of our favorite local brewers, is opening a location in Ocean Beach - just down the coast from us.

I first heard rumors about the new location (on Bacon Street - where an old Boll Weevil used to be) about a year ago. Construction was stalled for quite some time (issues with their liquor license, I think), but they now appear to be moving full speed ahead. We took a bike ride down to OB yesterday to have lunch at Newport Pizza, and snapped the above photo.

To say that we're looking forward to the opening would be an understatement.

Update (3/15/2010): We went by today and they are looking pretty much done with the exterior. More importantly, you can see that they've got their brewing equipment installed!

Pizza Port in Ocean Beach