Thursday, October 22, 2009

Homemade Guanciale

Guanciale

We've been remiss in following up on the Guanciale we made earlier this year. We just recently cooked the last few remaining bits of it, so I figure now is a good time to revisit it.

Guanciale is a cured meat that is much like Pancetta, except that it is made with jowl instead of belly. We cured ours with a mixture of kosher salt, sugar, cracked black peppercorns and fresh thyme. This is what it looked like after about a week:

Guanciale

Then it was hung in the meat fridge until it was quite firm, but not too dried out  - a little over three weeks. When it was done, it came out looking like this:

Guanciale

We've used it in a number of dishes, but I want to highlight a couple. First, some Guanciale and Smoked Cheddar Sliders we made this summer:

Guanciale and Smoked Cheddar Sliders

And, of course, perhaps the most classic guanciale dish - Bucatini all'Amatriciana. We've been wanting to make this for a while, but we hadn't been able to find bucatini locally. We finally broke down and ordered some online.

The dish is extremely simple. We rendered down diced guanciale with some red onion and olive oil, added in some of Mario Batali's Basic Tomato Sauce, tossed it with cooked bucatini and served it with some grated Pecorino Romano:

Bucatini all'Amatriciana

Lovely, rich dish.

Thursday, October 15, 2009

Cabeza

Carnitas Taco

Sherry did a run out to Northgate Market recently, and came back with a bounty of pork products, including half a head. We popped the head in a pot, and slowly simmered it along with some tongues and trotters. Part of the results went into tacos, which were rich, sticky and very satisfying.

The rest went into a small batch of Testa (head cheese):

Coppa di Testa

We had warmed Testa on toast for breakfast this morning, and it really hit the spot.

Warm Testa on Toast

You can find more details on making Testa, along with our recipe for it here: Coppa di Testa.

Friday, October 9, 2009

Homemade Chorizo - Oaxacan Style

Oaxacan Chorizo

While we were in Oaxaca, we fell head-over-heels in love with the chorizo there. Here in San Diego, despite the wide availability of Mexican food products in general, we've been unable to find a chorizo that tastes as good.

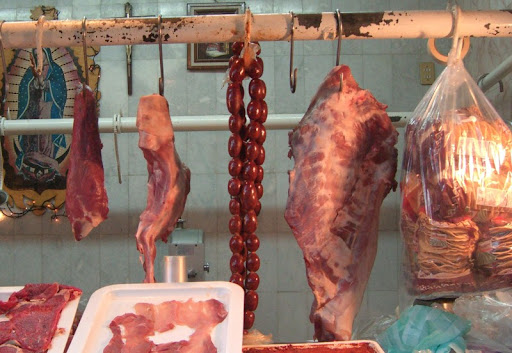
The chorizo we bought from our local carniceria in Oaxaca had a deeper color to it and a more complex and tangy flavor. Plus, we missed the pretty bolitas of chorizo we would see hanging amongst other lovely bits of meat:

Oaxacan Chorizo

Our solution to this problem (which will come as no surprise to regular readers of this blog) was that we would have to try to make it ourselves.

After a bit of experimentation, our recipe is something of a combination of a version from The Food and Life of Oaxaca, by Zarela Martínez and one from Rick Bayless' Authentic Mexican.

At its base, this chorizo starts like most pork sausages: a mixture of ground pork meat and fat (we use shoulder and belly). Where it differentiates itself is in the seasoning. The dark color comes from lots of chile - in both amount and variety. For this batch we used ancho, paprika, chipotle, guajillo and cayenne. Most of it is for depth of flavor, but it also adds a nice bit of heat.

Oaxacan Chorizo

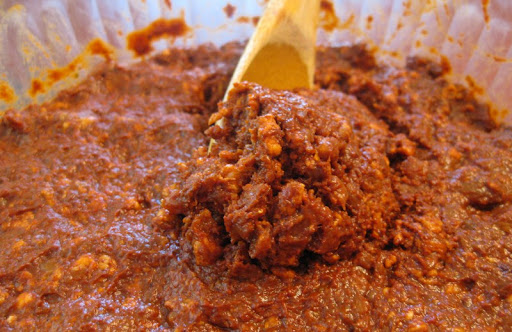
The taste gets an acid kick from some cider vinegar and is rounded out with herbs (thyme and oregano) and spices (peppercorns, cinnamon, clove and nutmeg).

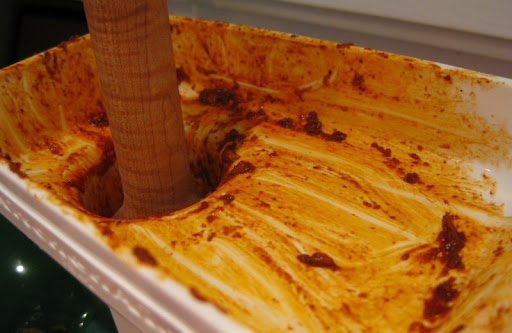
Into the sausage stuffer it goes:

Oaxacan Chorizo

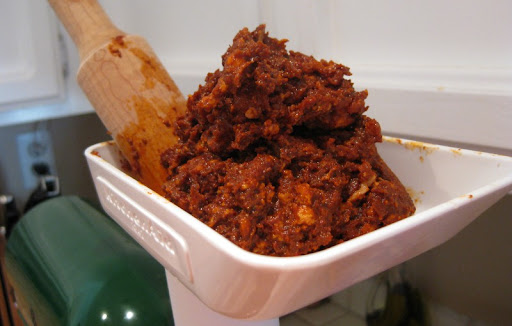
And the "after" shot, with the lovely, fatty, burnished-orange afterglow from the chorizo meat.

Oaxacan Chorizo

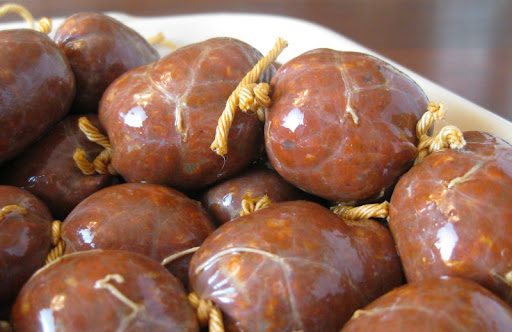
We were very pleased at how the bolitas of chorizo turned out:

Oaxacan Chorizo

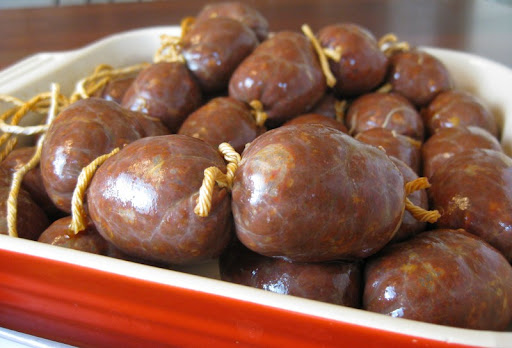
After stuffing it was into the magic fridge to hang for a couple of days (that's some saucisson sec hanging in the background).

Oaxacan Chorizo

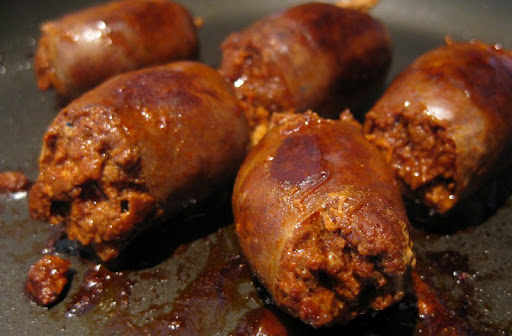
After it has tightened up a bit it is ready to go. The uses are endless. Just grab a few bolitas, toss them in a frying pan and cook them until they burst and spill out.

Oaxacan Chorizo

Then add it to your dish of choice. We have a growing number (such as our recipe for Chori-Migas), but one of the simplest and most satisfying is to use it as a topping for some breakfast memelitas:

Memelitas with Chorizo

The day just starts off better when it starts off with some chorizo.


Oxacan-style Chorizo

You'll want about 2 1/2 oz of whole dried chiles (anchos, guajillo, chipotle or another mixure of fairly mild chiles). If using ground chile, substitute with about 1 1/2 oz. Keep the meat very cold at all times to improve the grinding and stuffing process.

6-7 ounces pork belly
9-10 ounces pork shoulder
2 or 3 medium ancho chiles, seeded and stemmed
1 guajillo chile, seeded and stemmed
1 to 2 dried chipotle chiles, seeded and stemmed
1/2 teaspoon black peppercorns
2 whole cloves
1/2 inch cinnamon stick (preferably canela)
3/4 teaspoon mexican oregano or marjoram
1/4 teaspoon thyme
generous pinch ground nutmeg
2 teaspoons paprika
1/2 teaspoon cayenne pepper
2 1/4 teaspoons kosher salt (mortons)
1 garlic clove, whole
1 garlic clove, minced
1/3 cup cider vinegar
water for soaking chiles
Hog casings
Kitchen twine

Cut the pork belly and shoulder into finger shaped pieces 2 to 3 inches long (remove any tough or stringy gristle). Coarsely grind the meat with a meat grinder. Place into the refrigerator to chill while you prepare the seasonings.

Tear the chiles into large, flat pieces. In a hot, dry pan, quickly toast the chiles a few pieces at a time, just until they start to change color and/or blister. This will only take a few seconds - do not over cook or burn. Place the toasted chiles into a bowl, cover with hot water and soak until softened, about 20 minutes.

Place the peppercorns, cloves, cinnamon, oregano and thyme into a spice grinder and grind finely. If you do not have a spice grinder, add these to the blender in the next step, but run it much longer.

Drain the chiles (reserving the liquid) and place into a blender along with the ground spice mixture, the nutmeg, paprika, cayenne, salt, and 1 garlic clove. Add the cider vinegar and 5 tablespoons of the reserved chile soaking liquid, then blend until smooth.

Using a large spoon, thoroughly mix the seasoning and minced garlic into the ground meats. It will be quite loose. Cover and refrigerate overnight.

Prepare hog casings for stuffing by soaking in warm water at least 30 minutes. Change the soaking water and run fresh water through them to remove traces of salt. Stuff the meat into the casings, but leave each piece of casing unstuffed at least 6 inches at each end. Keep the long sausage link quite loose rather than densly packed (if too tight, the casing may burst while creating the small links). Starting in the center and working toward the ends, use kitchen twine to tie the sausage into short, tight rounds the size of a golf ball.

Hang the links in a cool airy place (50-60 degrees) for 36-48 hours or until they have firmed up and are dry to the touch. Be sure to put a baking tray lined with paper towels underneath the sausage to catch the drips. Cut the finished sausage into shorter sets of links, then wrap in plastic and refrigerate or freeze until ready to use.

Thursday, October 1, 2009

Lamb Offal Treats

Sauteed Lamb Kidneys with Onion, Garlic and White Wine

We've had a package of assorted lamb offal tucked away in our freezer for a while now, and we finally got around to putting it to good use. Pictured above is Sautéed Lamb Kidneys with Onion, Garlic and White Wine, from Essentials of Classic Italian Cooking by Marcella Hazan. This was the first time we've tried to cook kidneys, and the dish came out very well. Kidneys, like liver, have a very strong, intense flavor which I really enjoy, but can't eat too much of in one go. Perfect for an appetizer.

After that, we improvised a dish with lamb's heart - we sliced it, seared it quickly, and served it over a potato purée spiced with turmeric and cinnamon with some arugula mixed in.

Lamb's Heart with Turmeric and Arugula Potato Puree

I really love heart in general (beef, chicken, pork - you name it), and this proved no exception. Very good, and it went nicely with the potato - we'll definitely be making this again.

While cooking the previous two dishes, we had lamb tongue simmering in a pot on the back of the stove. The next day, we used it to make tacos:

Lamb Tongue Tacos

Oh yeah!

Sunday, September 27, 2009

Belgian Tripel IPA Partial Mash Recipe

Belgian IPA Trippel

There is a long history of American brewers being influenced by their Belgian counterparts, but lately the flow of ideas has been going the other way as well. In 2005, Hildegard van Ostaden was inspired by American IPAs and decided to brew a Tripel with an American IPA hop profile. The result was Urthel Hop-It, and it was very good indeed.

Our first exposure to this style was a Houblon Chouffe Dobbelen IPA Tripel at the Liars' Club, and we were instantly fans. Two of our favorite beer styles are the IPA and the Belgian Tripel, so it is no surprise that a combination of the two is right up our alley.

In the past few years, American brewers have begun to adopt the style as well. Here in San Diego, Green Flash's excellent Le Freak has been getting better with each year they brew it. We decided it was time to get in the game and try to brew one of our own, so we scoured the internet for information and cobbled together a recipe.

Tripels are generally higher octane than IPAs (and most double-IPAs). For our Tripel IPA we were shooting for an original gravity of about 1.082, which a lot of fermentable sugars. Going with the Tripel style, we used Pilsner malt supplemented with clear candi sugar to get the high gravity while keeping a light color and body.

Candi sugar has very large, nearly half-inch crystals. This is what it looks like:

Belgian Candi Sugar

Given the amount of fermentables, we decided to get things going with a two-cup yeast starter culture to give things a kick-start. And man did it ever kick-start. The next morning the wort was moving around like crazy and bubbling so hard it sounded like a motor running.


Fortunately, it didn't quite overflow the air-lock, so we didn't have a mess to clean up.

The resulting ale turned out very well - golden in color and full of flavor. The distinctive Belgian yeast character is balanced very nicely by the aroma and bitterness of the hops. Apparently our yeast was very happy since we achieved a higher level of conversion than expected - with an ABV of 9.2%, it packs quite a punch. Definitely not a session beer...

Belgian IPA Trippel

Belgian Tripel IPA

Total batch size = 5 gallons; Partial Mash in 3 gallon beverage cooler; ~3 gallon 60 minute stove-top boil; late malt extract addition; dry hopped for aroma; target abv of 8.5%

Ingredients:

5 1/2 lb Pilsner Malt (Belgian)
1/2 lb Wheat Malt
5 lb Briess Pilsen Dry Malt Extract (DME)
1 1/2 lb Candi Sugar, Clear
2 oz Columbus Hops (12.3% AA)
1 1/2 oz Saaz Hops (4.0% AA)
1 oz Amarillo Hops (8.5%)
1 tablet Whirlfloc
White Labs WLP550 Belgian Ale Yeast
4 oz corn sugar (optional - for bottle priming)
2 1/2 oz light or pilsen DME, plus 1 T cane sugar (optional - for starter culture)

Hop Schedule:

1/2 oz Columbus - 60 minutes boil
1/4 oz Columbus - 45 minutes boil
1 1/2 oz Saaz - 15 minutes boil
1/4 oz Columbus - 10 minutes boil
1/2 oz Columbus - 0 minutes boil
1/2 oz Columbus - Dry Hop in Secondary Fermenter
1 oz Amarillo - Dry Hop in Secondary Fermenter

[Optional: Prepare a starter culture the day before brewing. Heat 2 cups water then add 2 1/2 oz DME and 1 tablespoon sugar. Boil 10 minutes, then cool quickly to room temperature. Put into a sanitized 1 quart jar or bottle, add yeast, seal and shake gently for 30 seconds. Loosen the lid or use an air-lock to allow gases to escape and let sit until time to pitch the following day.]

Heat 8.25 quarts water to 165 degrees for a target mash temperature of 150-153 degrees. Place the 6 pounds of crushed grain (Pilsner and Wheat) into a large mesh bag. Pour the hot water into the beverage cooler, then lower the grain bag into the water very slowly, pushing and prodding with a large spoon to ensure all the grain is wet (this can take several minutes). Put the lid on the cooler and allow to rest 60 minutes.

While the grains are mashing, heat another 4-5 quarts of water to 180-185 degrees for sparging (rinsing the grains). Near the end of the 60 minutes, heat 2 quarts of water to a boil in your brew pot.

After the first mash is complete, remove the cooler lid and open the spigot to draw off about 2 quarts of wort into a large pitcher. The first draw will likely be cloudy with grain particles; pour it gently back into the cooler over the grain bag to help filter it. Draw off the remaining wort by the pitcher-full and carefully pour that wort into the boiling water in your brew pot; continue until only a trickle of wort leaves the spigot.

Pour about 4 quarts of your hot sparge water over the grain bag in the cooler. Gently lift the bag up and down to thoroughly re-wet the grains (but don't slosh). Cover and let sit about 5 minutes. Use the spigot and a pitcher to draw off all of the second wort and add it to your brew pot. You should have about 3 gallons of wort.

Dissolve the candi sugar in the hot wort, being careful to keep the sugar from scorching. You can do this easily by suspending the crystals in a strainer or chinois as you bring the liquid to a boil. When ready, add hops according to the schedule. With about 15 minutes remaining in the boil, begin adding the DME one cup at a time, stirring to dissolve. At time zero, continue adding DME off the heat until all has been added (if needed, return to low heat for a few minutes to help dissolve the extract). Stir in 1 tablet Whirlfloc. Cover and let sit 10-15 minutes.

Move brew pot to an ice bath and cool quickly to less than 80 degrees. Transfer wort to a primary fermenter, straining most of the hops. Add water to reach the 5 gallon mark. Swirl vigorously then pitch the yeast.

Ferment in primary for 1 week, then transfer to secondary. After seven days, dry hop with 1/2 oz Columbus and 1 oz Amarillo. Keg or bottle after fermentation is complete (2 to 3 weeks in secondary).

Thursday, September 17, 2009

Pulled Pork Sopes ("Masa Boats")

Pulled Pork Sopes

We did a smoked pork butt a while back and were faced with the inevitable bounty of leftovers. Pulled pork tacos are our go-to dish for this circumstance, but we wanted to try something new. We decided to see how pulled pork would do as a filling for sopes. I'm glad we did, because it turns out that pulled pork sopes are really, really good.

Sopes are a delightful Mexican antojito made by forming little "boats" of masa and filling them with your ingredient of choice. We use a Rick Bayless recipe from Mexico One Plate at a Time. Given how easy sopes are to make, it is really more of a simple technique than a recipe.

You start by preparing masa just as you would for corn tortillas: add warm water to dry masa harina until it has the consistency of soft cookie dough, add a little salt (a scant teaspoon of kosher salt per two cups masa harina) and then let the dough rest at least 15 minutes to fully hydrate. Just before cooking, shape into balls about the size of a golf ball.

Masa Balls for Sopes

Once you have your masa balls ready, flatten them in a tortilla press to a thickness about twice what you would do for a tortilla and pop them into a dry frying pan over medium-high heat.

Sopes

Once they have puffed up a bit but are not too browned on the bottom, you can take them out and crimp up the sides to mold them into the sope boat shape:

Forming a Sope

Then it is back into the frying pan - this time with some oil drizzled around. Add in your toppings and cook the masa the rest of the way through.

Pulled Pork Sopes

Sopes are best eaten when they are just out of the pan with the masa still hot and crispy. When we have sopes we generally make a few different kinds. We really like simple ones with just a bit of cheese topped with salsa (we like them with both red and green - you can find the the recipe we use for salsa verde here).

Sope with Salsa Verde and Cheese

This time we had some leftover pipián, a pumpkin seed dip/salsa we learned to make in Oaxaca. It made for a very satisfying filling:

Pipián Sope

Sopes are a perfect blank canvas just waiting to take on the character of whatever ingredient you choose to fill them with. The next time you're thinking of having some tacos, try something different and make sopes instead.

Friday, September 11, 2009

Fallbrook Syrah Harvest

Fallbrook Syrah Harvest

We have some friends who are way more serious about making wine than we are. Recently, they have been starting with whole grapes rather than using juice concentrate from wine kits. This year, they purchased Syrah grapes from a small vineyard in Fallbrook.

Last weekend, the timing was right and we were roped into providing free labor for given the opportunity to experience the grape harvest. We hauled ourselves out of bed at 5:00 (!) and groggily made the drive up I-15 to Fallbrook. The early hour and a bit of cloud cover provided a reasonably cool temperature. Given that the respite from the heat was temporary, we wasted no time getting to the grapes.

Fallbrook Syrah Harvest

We were given a quick lesson on evaluating grape clusters (discard them if they are predominantly dried up and elongated rather than round) and then it was time to grab our buckets and shears and get to it.

Fallbrook Syrah Harvest

What our group of amateur harvesters lacked in talent, we made up for with numbers. A little over an hour after we began, there wasn't a grape to be seen on the vines.

Fallbrook Syrah Harvest

The total came to around 250 pounds of grapes. That was less than had been anticipated (the same vineyard produced four times that amount last year), but the hope is that the juice will be of a higher quality.

Fallbrook Syrah Harvest

With harvesting finished, it was time to de-stem. Fortunately, modern equipment makes this a pretty painless process.

Fallbrook Syrah Harvest

The grapes go in the top:


The stems shoot out the side:

Fallbrook Syrah Harvest

And the grapes themselves funnel nicely out the front.

Fallbrook Syrah Harvest

At this point the grapes were broken up a bit, but not fully crushed. To keep them cool for the trip back to San Diego, they were packed in big plastic buckets with dry ice (further crushing and yeast addition would happen back home).

Fallbrook Syrah Harvest

The freshly pressed grape juice had a very nice sweet, clean taste. We're looking forward to tasting the wine in a few years.