Thursday, August 27, 2009

Watermelon

Watermelon

As I write this at 8:00 in the evening, our thermostat is still reading 83°.

We do not have air conditioning since we don't normally need it - except for the few really hot days like today that we get each summer.

When it's hot, there's nothing quite like the cool, refreshing taste of watermelon. The one pictured above is probably the best we've ever had. It is from Maciel Family Farm - one of our favorite vendors at the Pacific Beach Farmers Market.

You can't see it in the picture above, but the skin color was rippled with a deep, rich green - not washed out like you tend to get with an average supermarket melon. Cutting it in half revealed a beautiful ruby red flesh that seemed the perfect embodiment of Summer. And the taste? Pure heaven. Intensely sweet - but a clean, pure kind of sweet.

It was really great in a fruit salad, but the best bit was definitely those first few scoops straight from melon to mouth.

Friday, August 21, 2009

Operation Cheap-Ass Summer White

Cheap Ass White

Sherry has been wanting to make wine for a while now, but I've been reluctant. I just wasn't convinced that we could make a wine that we would enjoy as much as wines we can buy at the same price point. To be honest, I wasn't convinced that we could make a wine that we would enjoy, period!

But Sherry was persistent that she wanted to give making wine a shot. Surrendering to the inevitable, I theorized that the best path to success would be to do a simple, inexpensive white wine. My reasoning was that a style that generally isn't messed with much would be harder to mess up, and that the inexpensive end of the spectrum was more likely to give us a better value than we can buy. Not to mention that if it ended up being a complete bust it would at least be an inexpensive complete bust.

Thus began what I've dubbed "Operation Cheap-Ass Summer White". Sherry bought an Italian Pinot Grigio kit online from Fine Vine Wines, snagged some wine making equipment that a friend wasn't using, and soon had 6 gallons of grape juice fermenting away.

It is now ready to drink, and I'm happy to report that it turned out pretty well. I'd say that it tastes on par with the less expensive whites we buy, which run about 6 or 7 dollars a bottle. And how much did it cost to make? Here's the breakdown:

Italian Pinot Grigio kit: $67
Corks: $6
Shrink wrap capsules (foils): $4
6% sale discount: -$4.60
Shipping: $9

Total: $81.40
We got 29 bottles out of the batch (it was supposed to yield 30, but we lost a bit while racking off sediment at bottling time). That puts the per-bottle cost right around $2.80. Cheap-ass indeed.

Thursday, August 13, 2009

Spaghetti With Tomato Salsa Cruda

Spaghetti with Salsa Crudo

So Sherry is out of town for a couple of days and I'm on my own.

It feels very strange pulling out just a single glass from the cupboard.

It feels even stranger being completely responsible for dinner!

In case you haven't guessed already by reading previous posts of ours, while I may be the source of much of the inspiration for what we do, Sherry is very much in charge when it comes to the execution.

Last night, being temporarily responsible for both the inspiration *and* the execution, it was all on me to figure out what to make for dinner. It needed to be heavy on the inspiration, while at the same time being easy on the execution. I went with a simple, summer-focused tomato pasta dish based on ideas I got from this thread on eGullet. It isn't so much a recipe as it is a simple process and a state of mind.

While making breakfast, I also chopped up a few cloves of garlic (four, I think). I put the garlic in a medium-sized bowl and generously covered it with extra virgin olive oil. Don't hold back on the olive oil, since that is the only fat in the dish and we want the richness that it provides.

Spaghetti with Salsa Crudo

If that looks like a lot of garlic to you, have no fear - it mellows nicely. If you aren't a big garlic fan, I guess you could use less. Or just make a different dish...

The olive-oil-covered garlic just sits at room temperature on the kitchen counter for the day - the flavor of the garlic slowly leaching out into the oil.

A few hours before I wanted to have dinner, I diced up a couple of good-sized tomatoes (around 10oz, total) and popped them into the garlic oil. I added a few generous pinches of kosher salt, gave it a quick stir, and then left it alone for a while longer.

Spaghetti with Salsa Crudo

After a few hours with the odd stir now and then (and admittedly stealing bits of tomato "to make sure it tastes right") the mixture was transformed. The tomatoes softened and gave up much of their juices to mix with the oil to become a rich, fragrant sauce.

Spaghetti with Salsa Crudo

At this point, I admit that I could happily spoon this stuff into my mouth now and call it a day. I smells amazing and tasted event better. But, we need to control ourselves and do a bit more to pull the dish together.

Spaghetti with Salsa Crudo

Heat some water, salt it generously, grab some spaghetti (we keep ours in an Oban canister, don't you?) and toss it in to cook. And yes, "grab some" is the measurement. I told you in advance this wasn't really a recipe!

Spaghetti with Salsa Crudo

When the spaghetti is ready, drain it and mix it in the pasta pot with the tomato sauce. Serve it in a bowl and top it with a chiffonade of basil. What? You don't have a chiffonade of basil? Neither did I, but I quickly rectified the situation. I told you in advance this was more a state of mind than a recipe...

The result was exactly what I was looking for. Richness from the olive oil, pungent depth from the garlic, and drawn together perfectly by the essence of the tomato.

Spaghetti with Salsa Crudo

All in all, I think I did pretty well.

I'm still very much looking to having Sherry back tomorrow, though.

Thursday, August 6, 2009

Magic Fridge - Now With Beer!

Beer Meat and Cheese Fridge

So, the already magic meat and cheese curing fridge got a bit more magical.

I see your meat and cheese. And I raise you beer!

The meat at the moment is a bit meager - just a few kielbasa hanging for a bit to tighten up, and the cheese is currently hidden away in side drawers. The beer, on the other hand, is going full steam.

We have two batches on tap in the magic fridge - a Belgian Tripel IPA (which I am sure will get its own post in future) and a kegged version of our Piggish IPA.

Freedom from bottling is a wonderful thing!

All hail the magic fridge!

Tuesday, July 28, 2009

Tuscan Salami and Our New Meat / Cheese Slicer

Tuscan Salami

Just because we haven't said anything for a while about our magic meat and cheese curing fridge, that doesn't mean there hasn't been anything going on. Quite the contrary, in fact.

Case in point: our latest foray into the world of dry-cured sausages - Tuscan Salami.

After having great success with Saucisson Sec, which is about the most basic cured sausage you can make, we decided to up the ante and do a fermented, cured sausage. Tuscan Salami seemed like a very good place to start. Like Saucisson Sec, it is made from simply seasoned pork - in this case with garlic, a touch of fennel and a bit of red wine (the recipe we used was from Charcuterie).

Tuscan Salami is a larger beast than we've made before, and thus called for a larger casing. We used narrow beef middles. This should give you a picture of the initial size:

Tuscan Salami

As I mentioned earlier, this is a fermented sausage. Fermentation adds that characteristic twangy bite that is prototypical of what I, as an American, think of as a "salami".

The fermentation process starts by mixing sugars (dextrose and dry milk powder, which adds lactose) into the sausage meat base and then adding in a small amount of a beneficial live culture: Bactoferm F-RM-52. As counter-intuitive as it may seem, the resulting raw, stuffed sausages then rest for 12 hours at about 85ºF while the culture (the good bugs) eat the sugars and produce lactic acid. If all goes well, the pH decreases enough to turn the raw meat mixture into a decidedly unattractive place for any bad bugs out there (and adds that nice, tangy flavor as well - a very pleasant side effect). Afterward, the freshly fermented sausage doesn't really look any different, but it has most definitely changed.

Next up is the drying time in the magic fridge. A mere four weeks later, it emerged looking like this:

Tuscan Salami

Fermentation is not the only new trick in our cured meat arsenal, however. We decided that we needed a slicer to do justice to the gems that our magic fridge has been turning out. After scouring Amazon reviews it was pretty easy to decided on the Chef's Choice 610 Premium Electric Food Slicer from EdgeCraft. Unless you are willing to spending the $500-$1000 it takes to get a commercial quality slicer, at $100 the Chef's Choice 610 seemed like the clear best bet. As one reviewer put it, "this is not a commercial machine but it thinks it is".

Tuscan Salami

So far, we've been extremely happy with it. It easily slices super-thin slices of salami (and cheese).

Tuscan Salami

The result of our foray into the world of fermented, dry-cured sausages and the acquisition of new slicing apparatus have both paid off handsomely:

Tuscan Salami

Definitely the nicest cured sausage we've made so far (which is good, since we made a lot of it!). The thin slices our new slicer provides taste noticeably better than hand-cut. The skinnier slices are all surface area and make for rich, meaty, aromatic morsels.

We've been eating a lot of the salami straight up with crackers and maybe a bit of cheese, but it has been fun to use in other contexts as well. We did a nice grilled pizza with it the other day and, given our current "have meat, must make banh mi" mindset, this was inevitable:

Tuscan Salami Banh Mi

Friday, July 17, 2009

Rancho La Puerta and La Cocina Que Canta

La Cocina Que Canta

A few weeks ago we had the pleasure of being invited down to Tecate to spend the day at fitness resort/spa Rancho La Puerta and their associated cooking school, La Cocina Que Canta. We met up with other local food bloggers and some folks from Slow Food Urban at the Old Town Trolley Station - the point of departure for their new one-day Saturday program.

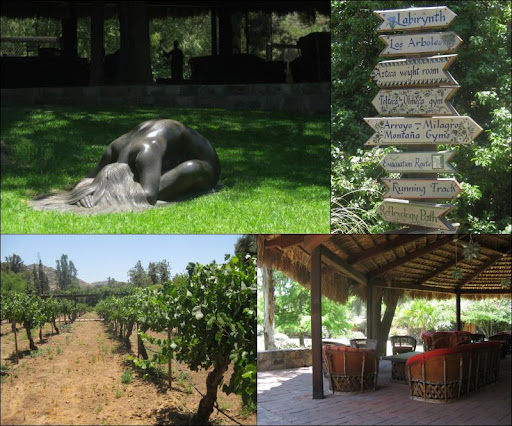
On the way down, Marketing Director Peter Jensen gave us an overview of the rich history of the Ranch. In operation since 1940, Rancho La Puerta was founded by Edmond Szekely and his wife Deborah (pictured below). Szekely, who had been holding health camps all over the world, settled on Tecate as a permanent location.

The impression you get from hearing Peter talk about the Szekely's is that the division of responsibilities was pretty clear from the beginning - Edmond was the visionary and would lecture the guests in his philosophy of healthy living while Deborah managed everything else. Now in her late 80's, she seems to still be very much the driving force behind Rancho La Puerta.

La Cocina Que Canta

Located on a sprawling 3000 acre property (most of it undeveloped), the Ranch is a very appealingly peaceful place. Following a tour of the facilities (which include swimming pools, gymnasiums, hiking trails and, of course, the spa) we had a light lunch. The food is health conscious and vegetable-focused, but was vibrant and flavorful. Most of the produce they use comes from their own garden.

Following lunch, with everyone else scattered to their various massages, pedicures and what have you, I happily relaxed with a book in a shady, outdoor seating area and passed a very pleasant couple of hours.

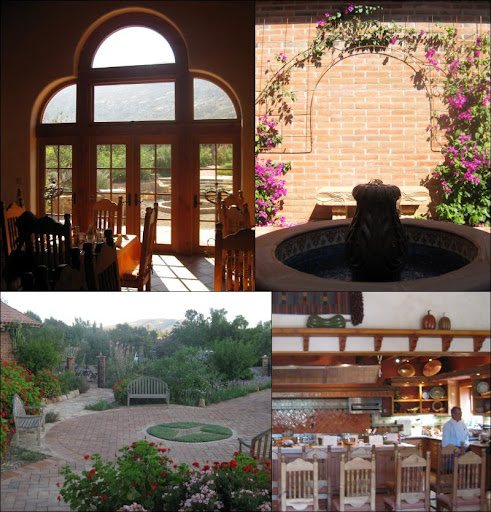
When we regrouped, we headed off for a short drive to the Ranch's cooking school. La Cocina Que Canta ("the kitchen that sings") has only been operating for a short while (about a year, if I recall correctly).

The space is beautiful and welcoming.

La Cocina Que Canta

I was a bit taken aback as we entered the kitchen and were greeted by the chef who was... Belgian! Not exactly what I was expecting from a cooking class in Mexico, but it turns out that they often have guest chefs giving their classes. In this case, the chef was Michel Stroot, who had been the chef at The Golden Door (founded by, but no longer owned by the Szekely family).

After a brief introduction, we were whisked out into the garden to collect a few remaining ingredients for the meal. The 6-acre organic farm is managed by Deborah's daughter. There was a huge variety of produce and herbs, all at various stages of maturity. As we toured through the garden, we picked celery, parsley and chives.

La Cocina Que Canta

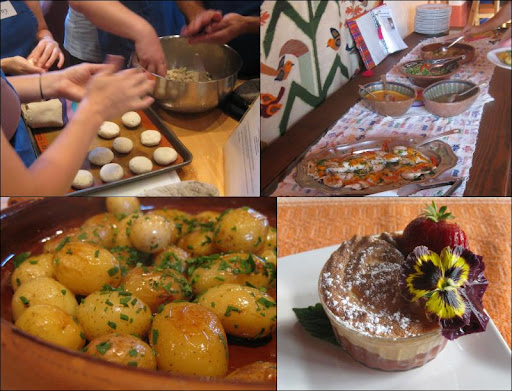
Back in the kitchen, it was time to divide into groups, pick a recipe and start cooking. Sherry and I worked on the appetizer - Quinoa Papaya Mold with Crab Meat and Citrus Dressing. I don't tend to be a big quinoa fan, so I was surprised at how much I liked this dish. Ribbons of red pepper (painstakingly, and expertly julienned by Sherry) added visual appeal, bits of celery (painstakingly, if not expertly chopped by yours truly) added a nice texture, and the acid bite of the dressing brought everything together.

La Cocina Que Canta

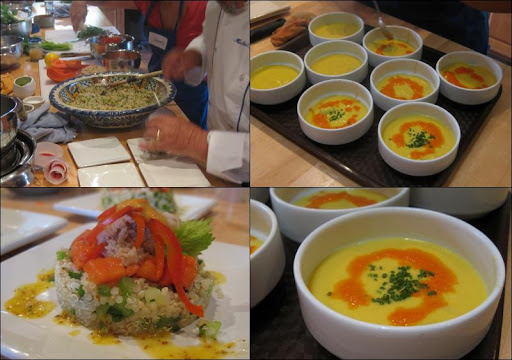
The soup - Chilled Cream of Corn Soup with Avocado, Lime and Red Pepper Coulis was also very good. The coulis, in addition to being quite pretty, added a nice flavor contrast to the sweet corn base. We liked it so much we've since made it at home, and it was great a second time as well.

The main dish was grilled tilapia with two sauces - a tomatillo salsa and a chipotle cream sauce, both of which had fantastic depth of flavor. Sides were green beans with toasted sesame seeds, fingerling potatoes with parsley, and very nicely handmade corn tortillas. Dessert was a Plum Apple Compote with Orange Meringue (garnished with edible flowers from the garden).

La Cocina Que Canta

All in all, a lovely meal, a fantastic setting and good company. What more could you ask for?

Churros, of course!

Yep, there is always room left for churros. On the brief drive back to the border, we lobbied heavily to stop at a churro vendor whose praises Peter had convincingly sung earlier in the day.

La Cocina Que Canta

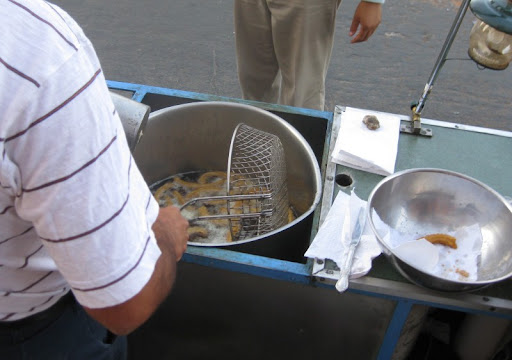
Churros, when freshly and expertly made, are a perfect thing - hot, crispy morsels of finger food composed purely of delicious carbs and fat with nothing else in the way to detract from them.

These particular churros were absolutely fresh and expertly made, and provided the perfect ending to a very nice day.

Wednesday, July 8, 2009

Rye IPA - Partial Mash Recipe

Rye IPA

Ever since we first had a pint of Alpine Beer Company's Nelson Golden Rye IPA, we have been wanting to brew a "RyePA". Given that we didn't have any of the New Zealand Nelson Sauvin hops that Alpine's beer is named after, creating a Nelson clone was out of the question. Still, we figured we could take a shot at the "Golden Rye IPA" part.

The rye in our recipe is whole malted rye grain. Rye malt is not available in extract form, which was one of our motivations for moving to partial mash brewing.

This is what the rye looks like cracked:

Rye Grain

Definitely darker in color than malted barley - below you can see them together for comparison:

Piggish RyePA

Rye has twice the coloration potential as barley - about 3.7L vs 1.8L (the "L" stands for Lovibond, a unit of color measurement). Given this, we were a bit worried that we would not be able to achieve the bright, golden, "West Coast IPA" look that we wanted. Our standard IPA recipe uses a bit of crystal malt specialty grain, but to counter the increased color potential, we were careful to use a very light version (10L) - we even considered dropping it altogether.

Color wasn't a problem, though, as you can see here:

Rye IPA

Exactly what we were going for. Pretty much the same color as our Blind Pig ("Piggish") clone. We used very similar recipes for both beers, with exception of substituting rye for about 12% of the grain in the mash and increasing the hops in secondary.

Below, you can see the two beers side-by-side (the rye is on the right):

Rye IPA and Piggish IPA

Any perceived difference in color is mostly due to lighting - they looked virtually identical save for a difference in carbonation.

And the taste? Also similar, yet different. I would say that the rye added a more round and complex malt flavor. We've tasted them together a number of times now: sometimes I prefer one, sometimes the other. Depends on my mood. A little variety (even if subtle) is nice to have, though, and we'll definitely be making this beer again.

Piggish Rye IPA

Total batch size = 5 gallons; Partial Mash in 3 gallon beverage cooler; ~3 gallon 60 minute stove-top boil; very late malt extract addition; dry hopped for aroma; target abv of 6.5%.

3 3/4 lb 2-Row Pale Malt
3/4 lb Rye Malt
1/2 lb 10L Crystal Malt
1/2 lb Carapils/Dextrin Malt
1/2 lb Wheat Malt
4 1/4 lb Briess Golden Light Dry Malt Extract (DME)
2 oz Columbus Hops (12.3% AA)
2 oz Cascade Hops (6% AA)
1 1/2 oz Simcoe Hops (13.2% AA)
1 oz Centennial Hops (8% AA)
1 tablet Whirlfloc
White Labs WLP001 California Ale Yeast
4 oz corn sugar (for bottle priming)

Hop Schedule:

1 oz Columbus - 60 minutes boil
1/2 oz Cascade - 30 minutes boil
1 oz Cascade - 15 minutes boil
1/4 oz Columbus - 2 minutes boil
1/2 oz Simcoe - 2 minutes boil
1 oz Columbus - Dry Hop in Secondary Fermenter
1/2 oz Cascade - Dry Hop in Secondary Fermenter
1 oz Simcoe - Dry Hop in Secondary Fermenter
1 oz Centennial - Dry Hop in Secondary Fermenter

Heat 8.25 quarts water to 165 degrees for a target mash temperature of 150-153 degrees. Place the 6 pounds of crushed grain (2-Row Pale, Rye, 10L Crystal, Carapils and Wheat) into a large mesh bag. Pour the hot water into the beverage cooler, then lower the grain bag into the water very slowly, pushing and prodding with a large spoon to ensure all the grain is wet (this can take several minutes). Put the lid on the cooler and allow to rest 60 minutes.

While the grains are mashing, heat another 4-5 quarts of water to 180-185 degrees for sparging (rinsing the grains). Near the end of the 60 minutes, heat 2 quarts of water to a boil in your brew pot.

After the first mash is complete, remove the cooler lid and open the spigot to draw off about 2 quarts of wort into a large pitcher. The first few draws will likely be cloudy with grain particles; if so, pour it gently back into the cooler over the grain bag to help filter it. Draw off the remaining wort by the pitcher-full and carefully pour that wort into the boiling water in your brew pot; continue until only a trickle of wort leaves the spigot.

Pour about 4 quarts of your hot sparge water over the grain bag in the cooler. Gently lift the bag up and down to thoroughly re-wet the grains (but don't slosh). Cover and let sit about 5 minutes. Use the spigot and a pitcher to draw off all of the second wort and add it to your brew pot. You should have about 3 gallons of wort.

Bring the wort to a boil and add hops according to the schedule. At time zero, remove from heat and add the DME one pound at a time, stirring to dissolve (alternatively, with 15 minutes left, carefully begin adding DME by the cup-full, stirring well between each addition; at time zero, add the remaining DME off the heat). Stir in 1 tablet Whirlfloc. Cover and let sit 10-15 minutes.

Move brew pot to an ice bath and cool quickly to less than 80 degrees. Transfer wort to a primary fermenter, straining most of the hops. Add water to reach the 5 gallon mark. Swirl vigorously then pitch the yeast.

Ferment in primary for 1 week, then transfer to secondary and dry hop with 1 oz Columbus, 1/2 oz Cascade, 1 oz Simcoe and 1 oz Centennial. Bottle or keg after fermentation is complete (2 to 3 weeks in secondary).